Netskope Private Access for Microsoft Active Directory Domain Services
This article explains how to configure Netskope Private Access (NPA) applications for Microsoft Active Directory Domain Services, such as DNS, Kerberos, and WINS.
Often customers are looking for the same end-user experience in using Windows Active Directory Domain Services for mobile workforce as for on-premises. For example, if users working remotely on a company-managed Active Directory Domain joined device would like to connect to an on-premises application which uses Windows integrated authentication, they should not be prompted for a password.
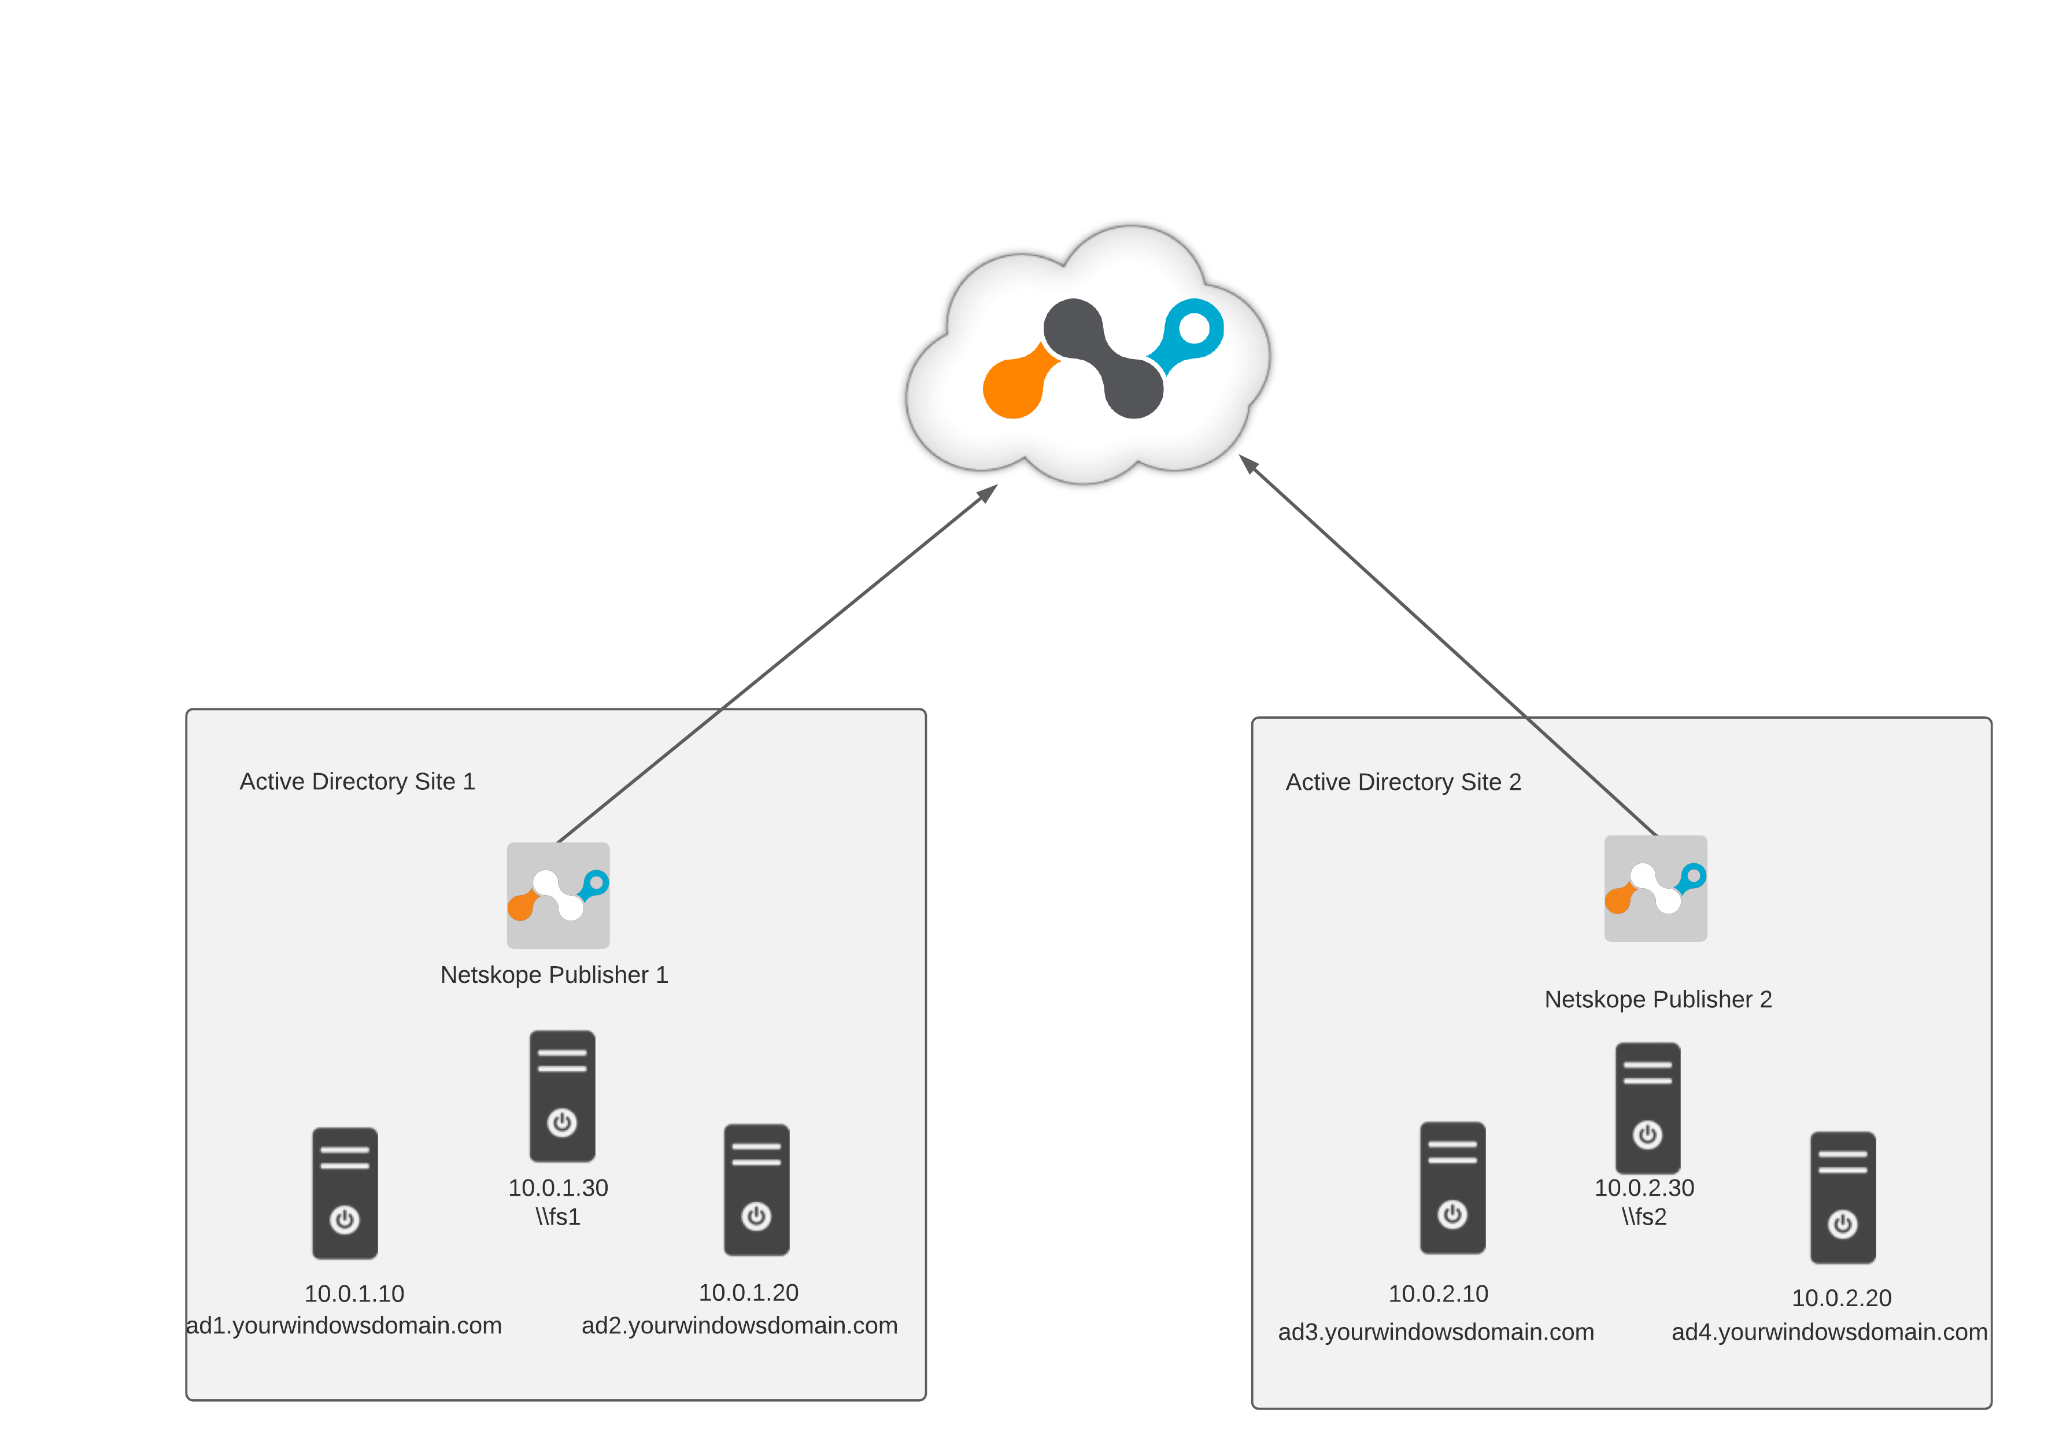
Netskope Private Access enables administrators to expand Domain Services experience to the remote users conveniently and securely. The following diagram shows an example:
 |
Configure Private Apps for DNS with the Publisher DNS Feature Enabled
The first step to enable end-users using Active Directory Domain Services and file shares remotely is to configure native, pass-through DNS resolution for the internal Active Directory Domain. In the default Netskope Private Access deployment, each private application is represented to the client with an artificial non-routable IP address that’s been returned to the user in the DNS query response.
For example, if an on-premises private application has an IP address 10.0.0.10, NPA publisher will be accessing it using this IP address, while the end-users will receive an artificial IP address like 191.1.1.5 when running a DNS query from their managed devices. To use Windows Domain Services, users have to use the real IP addresses of Windows Domain Controllers. To achieve this you need to configure a Private Application for DNS with the Publisher DNS feature enabled. This private DNS application allows users to join Active Directory Domains, query Active Directory groups policies, and FSMO roles from their remote devices.
Architecture Considerations
Deploy a Publisher per Data Center/Cloud collocated with the Active Directory servers.
For every Active Directory Domain (like
example.com,apac.example.com,europe.example.com) in the Forest will require an <Active Directory> and <Active Directory DNS> Private App definition (per the example Private App definitions in the following procedure) mapped to the correct Publisher based on their location.
To create a Private App definition, log in to the Netskope UI, and go to Settings > Security Cloud Platform > App Definition > Private Apps.
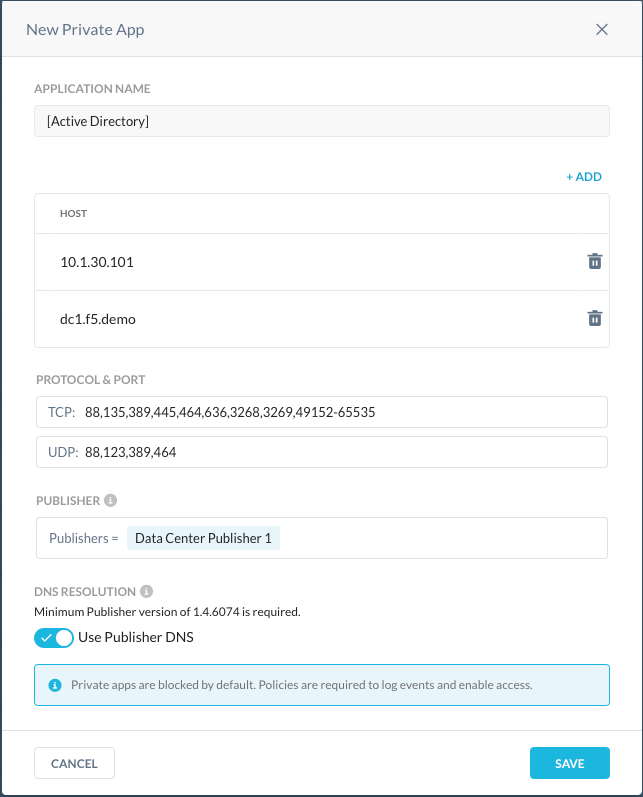
Click New Private App and enter these parameters:
Application Name: Enter a name, like Active Directory (or what every you prefer).
Host: Enter the FQDN and IP of every Active Directory server collocated at the same site as the Publisher.
TCP: Enter
88,135,137,139,389,445,464,636,1512,3268,3269,5357,1024-65535.UDP: Enter
88,123,135,137,138,389,464,1512,5357.Publisher: Select the Publisher collocated with the AD server.
Use Publisher DNS: Enable the toggle.

Click Save.
Create a Private App definition that enables users to access Windows Domain Controllers from their managed devices.
Because the previous application you configured will return to the end-user internal IP address of the domain controller, you need to configure a private application that encompasses IP addresses for all domain controllers so that they become accessible via Netskope Private Access .
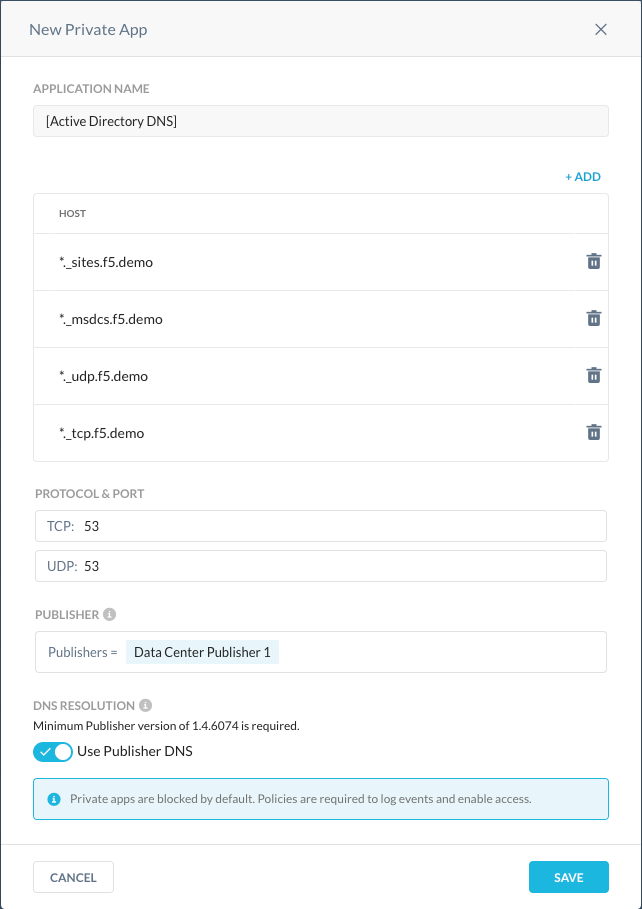
Click New Private App and enter these parameters:
Application Name: Enter a name like Active Directory DNS (or whatever you prefer).
Host: Enter these hosts:
*._msdcs.<domain>*._tcp.<domain>*._udp.<domain>*._sites.<domain>*._kkdcp.<domain>*._http.<domain>
TCP: Enter
53.UDP:
53.Publisher: Select the Publisher(s) that can access your local internal DNS server resources.
Use Publisher DNS: Enable this toggle.

Click Save.
Create new Private App Access policy using the criteria specific to your environment. Go to Policies > Real-time Protection, click New Policy, and select Private App Access.
Enter the parameters using the criteria specific to your environment.
Source: Select whatever you prefer.
Destination: Select Private App, and then select the Private App definitions you created (per this example, Active Directory DNS and Active Directory).
Profile & Action: Select Allow.
Set Policy: [Enter a name for the policy (whatever you prefer).
Status: Enable this togglee

Click Save.
Click Apply Changes.
Active Directory Port Definitions
Port Number | Protocol(s) | Service\Description |
|---|---|---|
53 | TCP/UDP | DNS |
88 | TCP/UDP | Kerberos |
123 | UDP | NTP / Time |
135 | TCP | RPC Endpoint Mapper |
389 | TCP/UDP | LDAP / CLDAP |
445 | TCP | CIFS / SMB |
464 | TCP/UDP | Kerberos Password Change |
636 | TCP | LDAPS |
3268 | TCP | Global Catalog LDAP |
3269 | TCP | Global Catalog LDAPS |
9389 | TCP | ADWS (used by Powershell) |
49152-65535 | TCP | High Ports for RPC |
In the above configuration:
Host remote device will be accessing domain controllers using domain SRV records
_gc._tcp.<yourwindowsdomain.com>and_ldap._tcp._sites.DomainDnsZones. yourwindowsdomain.com, so we’re definingyourwindowsdomain.comand*.yourwindowsdomain.comwildcard as application FQDN to cover all DNS queries for Windows Domain Services.Port: Port 53 should be used for the DNS traffic.
If you’ve already deployed Publishers in ideal locations for accessing SCCM resources, your first step is to ensure that you’ve followed the best practices for deploying Active Directory services via Netskope Private Access. This ensures services like Kerberos, SRV resolution, and other services are available for proper SCCM authentication and selection.
If Active Directory is properly configured, then you can configure SCCM over NPA by following the process below:
Define Boundary Groups based on Active Directory Sites using the Publisher IPs or RFC 1918 subnets.
Define Application Definitions for SCCM resources.
Create Real-time Protection Policies to enable access to SCCM resources.
To learn more, go to: SCCM and Products: Netskope Private Access.