Configure Workday Instance for Next Generation SaaS Security Posture Management
The installation instructions describe how to integrate your Workday account with Netskope. To configure Workday for Next Generation SSPM, you need to authorize Netskope as a web application client to access your Workday account. To configure Workday for Next Generation SSPM, follow the instructions below.
Register an API Client in Workday
To integrate Netskope with Workday, you should create a new API client in Workday. To do so, follow the steps below:
Log in to your Workday account.
On the search bar, search for Register API Client, and click Register API Client.
On the Register API Client page, enter the following details:
Note
Only the mandatory fields (asterisk mark) should be configured. Rest of the fields can be left unchanged.
Figure 37. Workday Register API Client Window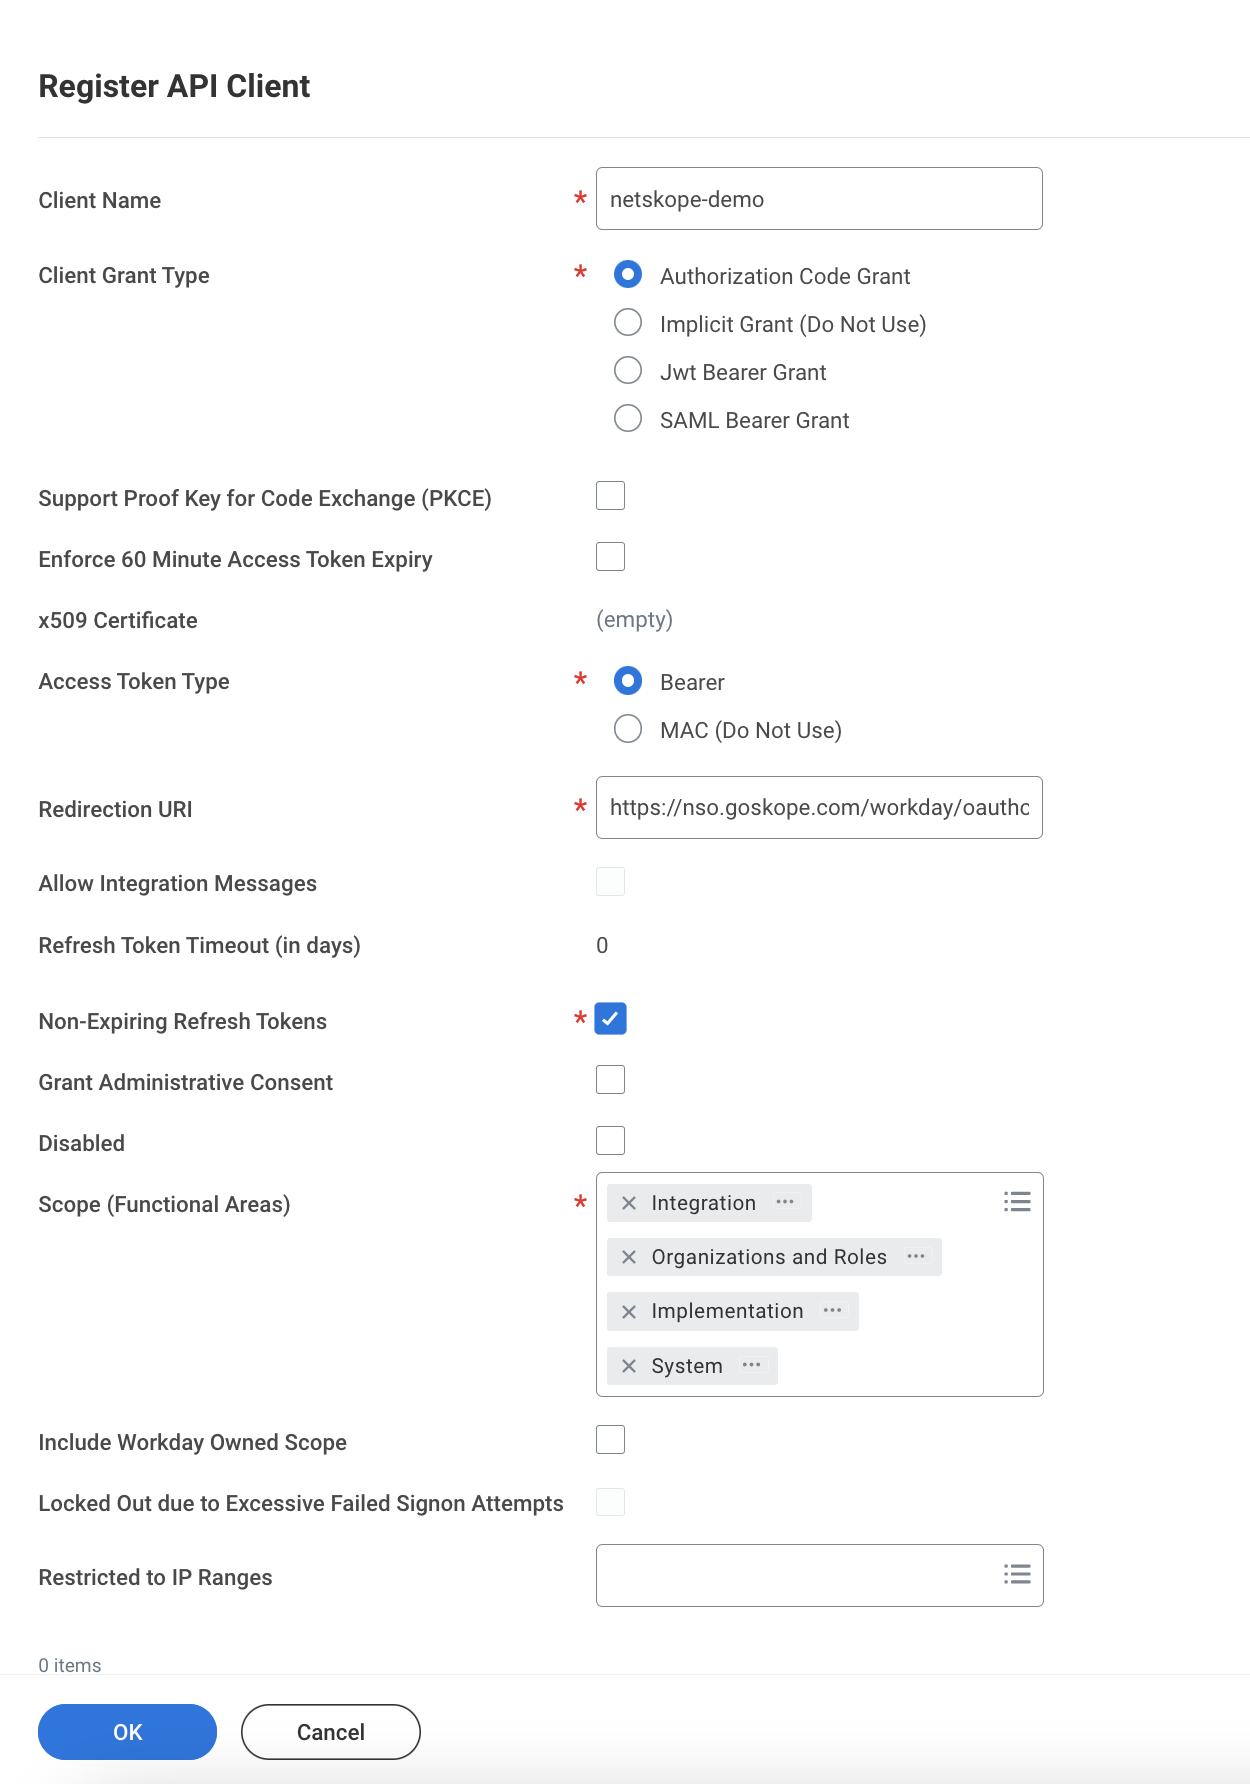
Enter a Client Name.
For Client Grant Type, select Authorization Code Grant.
For Access Token Type, select Bearer.
Set the Redirection URI to https://nso.goskope.com/workday/oauthorize.
Select the Non-Expiring Refresh Tokens checkbox.
Under Scope (Functional Areas), select Integration, Organization and Roles, Implementation, and System.
Click OK.
Note down the values of the following fields. These values will be required when you set up the Workday instance in the Netskope UI.
Figure 38. Workday Configured Values
Client ID
Note
Ensure that you do not use this client ID in any other 3rd party integration. The client ID should be used exclusively for Netskope integration.
Client Secret
Note
Client secret is visible as soon as you register the API client. Once you move away from the registration page, the client secret is not visible anymore. If you miss noting it down, you can generate a new client secret. To do so, search Generate New API Client Secret in the Workday search bar and follow the steps to create a new API client secret.
Workday REST API Endpoint
Token Endpoint
Authorization Endpoint
Create an Integration System User
Important
If you already have an integration system user, you can skip these steps.
Netskope integration with Workday requires an integration system user. To do so, follow the steps below:
Log in to your Workday account.
On the search bar, search for Create Integration System User, and click Create Integration System User.
On the Create Integration System User pop-up window, enter the following details:

Enter the User Name of the integration system user.
Enter the New Password and New Password Verify.
Click OK, then Done.
Configure Permissions for Integration System User
To configure an integration system user to authenticate the Next Generation SSPM, follow the steps below.
Create an Integration System Security Group
This section explains how to create a new integration system security group and assign it to the integration system user. For more information on security groups, see Concept: Security Groups. You will need a community account to access the Workday documentation.
Important
If you already have an integration system security group, edit the security group and assign an integration system user you created in the previous step.
To do so, follow the steps below:
Log in to your Workday account.
On the search bar, search for Create Security Group, and click Create Security Group.
On the Create Security Group pop-up window, enter the following details:

For Type of Tenant Security Group, select Integration System Security Group (Unconstrained).
Enter the name of the security group.
Click OK.
On the Edit Integration System Security Group (Unconstrained) window, enter the following details:

For Integration System Users, select the integration system user you created earlier. This will be the user who will authenticate the Next Generation SSPM.
Click OK, then Done.
Add Domain Security Policy to Security Group
This section explains how to add domain security policies and map it to the newly created integration system security group. To do so, follow the steps below:
Log in to your Workday account.
On the search bar, search for Maintain Permissions for Security Group, and click Maintain Permissions for Security Group.
On the Maintain Permissions for Security Group pop-up window, enter the following details:

Keep the Operation radio button set to Maintain.
In Source Security Group, select the newly created integration system security group.
Click OK.
On the Maintain Permissions for Security Group window, under the Domain Security Policy Permissions tab, click the + icon.

Enter the following details:

View/Modify Access
Domain Security Policy
Description
Purpose
Trade-off if not allowed
Get Only
Manage: Organization Integration
This domain provides access to the organization.
Gets organization details with all organization types for example: company, cost center, custom, matrix, pay group, region, retiree, supervisory, company hierarchy, cost center hierarchy, location hierarchy, region hierarchy.
The Netskope SSPM asset fetching and evaluation process will fail due to non-accessibility of data.
Get Only
User-Based Security Group Administration
This domain controls which groups can edit any user-based security group.
Retrieves Workday account and it's assigned user-based security groups.
View and Modify
Workday Query Language
This domain grants access to Workday Query Language (WQL). Users can execute REST calls using the WQL API to extract data from Workday data sources and view associated performance log information.
Netskope makes WQL API calls to get data.
View Only
Workday Account
This domain provides access to the management of Workday accounts.
Gets Workday accounts for a user.
Get Only
Special OX Web Services
This is a special domain that includes all web services required to migrate objects using Object Transporter (OX). Access to items secured to this domain only occurs while using OX.
Retrieves data related to Workday accounts associated with an integration system, and view group share configurations in tenant setup.
Get Only
Integration Security
This domain provides access to creation of system users and Workday accounts for integration systems.
Retrieves data related to Workday accounts associated with an integration system.
Get Only
Drive Web Services
This domain provides access to web service tasks for Drive items, such as viewing all user items, creating new items for users, and removing data for users.
Retrieves data for group share configurations in tenant setup.
View Only
Security Configuration
This domain provides access to security configuration including functional areas, security groups, domain security policies and business process security policies. It also includes reports to analyze and review the current security configuration.
Get Workday account details of a user.
View Only
Security Administration
This domain provides access to security administration tasks such as maintaining password rules, user name rules, tenant challenge questions, setting security proxies, etc. It also includes reports for security reviews.
View Only
Security Activation
This domain secures tasks for activating security policies. By having the activation to its own domain, customers can choose to implement segregation of duties, where one group of users has access to maintain policies and a separate group of users has access to activate the pending changes. This effectively introduces an "approval" into the process.
Note
On adding this domain security policy, following child polices get added too:
Lock Out Workday Accounts
Set Up: Public Profile
Set Up: Security Rules
Manage Authorized Applications
View Only
Purge Person Data
This domain provides access to run purges of privacy-regulated data for all persons returned by the report selected.
Note
On adding this domain security policy, Purge Single Entity Data child policy gets added too.
Click OK, then Done.
Activate Pending Security Policy Changes
Once you have added the domain security policies, it's time to commit the pending security policy changes. To do so, follow the steps below:
Log in to your Workday account.
On the search bar, search for Activate Pending Security Policy Changes, and click Activate Pending Security Policy Changes.
On the Activate Pending Security Policy Changes window, enter a comment and click OK.

Check Confirm and click OK.

Note
You may notice that the number of domain security policies are more than you added. This is because few of the domain security policies have child policies. They get added as well.
You should get an acknowledgment.

Configure a Workday Instance in the Netskope UI
To authorize Netskope to access your Workday instance:
Log in to the Netskope tenant and go to Settings > API-enabled Protection > SaaS > Classic.
Select the Workday icon, and then click Setup Instance.
The Setup Instance window opens. Enter the following details:
Instance Name: Enter the name of the Workday account without spaces.
Instance Type: Select the Security Posture checkbox. Select this option to allow Netskope to continuously scan through your SaaS app to identify and remediate risky SaaS app misconfigurations and align security posture with best practices and compliance standards.
Also, you have the option to run the policy at intervals (15 minutes, 30 minutes, 45 minutes, and 60 minutes).
Then, enter the following details that you already noted after registering the API client in Workday:
Client ID
Client Secret
Authorization Endpoint
Token Endpoint
Workday Rest API Endpoint
Click Save, then click Grant Access for the app instance you just created. You will be prompted to log in with a username and password. Enter the same username and password as per Create an Integration System User and then authorize Workday by clicking Allow. On successful confirmation, click Close.
Refresh your browser, and you should see a green check icon next to the instance name.
Next, you should configure a security posture policy. To do so, see Next Generation SaaS Security Posture Management Policy Wizard.