Configure ServiceNow for API Data Protection
Note
Netskope has now validated support up till ServiceNow Utah release.
To configure ServiceNow for API Data Protection, you need to authorize Netskope as a web application client to access your ServiceNow instance.
There are three parts to this procedure:
Configure ServiceNow API Access
Enable ServiceNow Table Permission
Configure a ServiceNow Instance in the Netskope UI
Configure ServiceNow API Access
To configure the ServiceNow API endpoint:
Log in to your ServiceNow account as an admin user.
On the left navigation, filter by System OAuth and click Application Registry.
Click New to create a new application registry.

Click Create an OAuth API endpoint for external clients.

Enter a name and client secret. The client ID is auto generated. Note down the client secret and ID; you will need these to create the ServiceNow instance in the Netskope UI.
You do not have to provide any value for Redirect URL and Logo URL.

Note
The default value of the refresh token lifespan is 86,400 seconds (approx. 100 days). After that, the token will not be valid, and data will not be accessible. Netskope recommends to enter a minimum value of 31,536,000 seconds (approx. 1 year) to ensure accessibility. Once the refresh token expires, the app instance in Netskope UI will be shown as inactive. You should re-grant the ServiceNow app instance in the Netskope UI.

When finished, click Submit.
Important
If there are any records with invalid dates (for example, a future date) in the problem table, ensure that you delete such records. To delete a problem record, read the ServiceNow article. This step is essential so that Netskope receives problem events successfully.
Enable ServiceNow Table Permission
Netskope now supports custom and additional default tables. They are:
Basic Configuration Item
Catalog Task
Change Phase
Change Request
Change Task
Feature Task
Group Approval
IMAC (Install Move and Change)
Incident
Incident Task
KB Submission
Knowledge
Problem
Problem Task
Release Phase
Request
Request Item
Task
Ticket
Any custom table created by the ServiceNow admin/user
For Netskope to scan through the tables listed above, an additional permission is required for API Data Protection to successfully make API calls to ServiceNow. To enable the permission:
Log in to your ServiceNow account as an admin user.
On the left navigation, search the term System Definition and click Tables.
Figure 6. ServiceNow System Definition Tables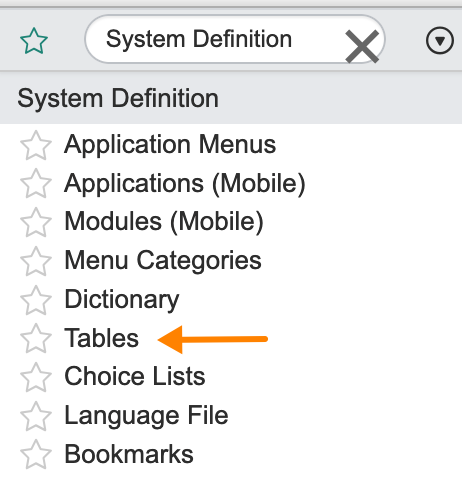
Search sys_db_object table by Name. Click the first row entry that reads sys_db_object.
Figure 7. ServiceNow sys_db_object Table
Under Application Access, select the Allow access to this table via web services checkbox.
Figure 8. ServiceNow Permissions
Note
If the can read checkbox is selected by default, you can keep it as is.
Click Update.
Follow the same steps for change_phase, cmdb, incident, kb_knowledge, kb_submission, problem and ua_custom_table_inventory too.
Configure a ServiceNow Instance in the Netskope UI
Make sure you don't have any ACL/IP ACL, business rules, or data policy constraints before setting up the instance.
The ServiceNow administrator should have access to the following tables and roles:
Table | Role | Usage |
|---|---|---|
change_phase | ITIL | Access records from the Change Phase table. |
cmdb | ITIL | Access records from the Base Configuration Item table. |
incident | ITIL | Access records from the Incident table. |
kb_knowledge | ITIL | Access records from the Knowledge table. |
kb_submission | ITIL | Access records from the KB Submission table. |
problem | ITIL | Access records from the Problem table. |
sys_db_object | ITIL | Get Incident and Problem table records. |
ua_custom_table_inventory | ITIL | Access records from any custom table. |
Though the tables above require the ITIL role, it is recommended to give the admin role to all the tables so that API Data Protection can access the delete notifications from ServiceNow.
To authorize Netskope to access your ServiceNow instance:
Log in to the Netskope tenant UI:
https://<tenant hostname>.goskope.comand go to Settings > API-enabled Protection > SaaS.Select the ServiceNow icon, and then click Setup Instance.
The Setup Instance window opens. Enter the following details:
Enter the name of the ServiceNow account instance.
Note
If your ServiceNow login URL is https://my_instance.service-now.com/, then enter my_instance as the instance name.
(Optional) Select the Enable ServiceNow GCC Support checkbox.
Important
Enable this checkbox if and only if you have a ServiceNow GovCommunityCloud (GCC) account. ServiceNow GCC compliance is designed for U.S. Federal, State, and local government customers.
Instance Type: Select the following check box:
API Data Protection: Select this option to allow Netskope to scan through your SaaS app instance to list files, user, and other enterprise data.
Security Posture: Select this option to allow Netskope to continuously scan through your SaaS app to identify and remediate risky SaaS app misconfigurations and align security posture with best practices and compliance standards.
Note
This feature is part of the Netskope SaaS Security Posture Management solution. For additional configuration requirement, read Next Generation SaaS Security Posture Management.
Malware: Select this option to detect malware in files and attachments. For more information to set up malware, see Creating a Threat Protection Policy for API Data Protection.
Enter the email address of the ServiceNow administrator.
Note
To identify the email address of the ServiceNow administrator account, log in to your ServiceNow account, navigate to User Administration > Users. Click the administrator user and note down the email address.
Netskope does not support SAML-based SSO for ServiceNow. The ServiceNow administrator email address must be a local user.
Click Save, then click Grant Access for the app instance you just created. You will be prompted to enter the following details:
ServiceNow Admin - Enter the user ID of the ServiceNow administrator.
Note
To identify the user ID of the ServiceNow administrator account, log in to your ServiceNow account, navigate to User Administration > Users. Click the administrator user and note down the user ID.
ServiceNow Password - Enter the password of the ServiceNow administrator.
Enter Client ID - Enter the client ID you noted when you configured the ServiceNow API access.
Enter Client Secret - Enter the client secret you noted when you configured the ServiceNow API access.
Click Grant. When the configuration results page open, click Close.
Refresh your browser and you will see a green check icon next to the instance name.