Step 2/3: Assign custom role permissions for Azure CSA
To perform continuous security assessment of your Azure infrastructure, create a custom role with the following permissions.
Microsoft.Network/networkWatchers/queryFlowLogStatus/action - This permission gets the status of flow logging on a resource.
Microsoft.Web/sites/config/list/action - This permission lists web apps' security sensitive settings, such as publishing credentials, app settings and connection strings.
Important
If you are configuring this instance for Security Posture with a combination of features such as DLP, Threat Protection, and Forensics, then you must create separate custom roles for each feature. For a combination of feature support, assign the roles based on the table below:
Feature/Role | Reader + Custom | Inbuilt Contributor |
|---|---|---|
Security Posture | ✓ | ✓ |
DLP, Security Posture | ✓ | ✓ |
Threat Protection, Security Posture | ✓ | ✓ |
Forensic, Security Posture | ✓ | ✓ |
Security Posture, DLP, Threat Protection, Forensic | ✓ | ✓ |
To create a custom role for CSA,
On your local laptop/desktop, create a JSON file with the following script and save the file as NetskopeCSA.json.
{
  "Name": "Netskope CSA Custom Role",
  "IsCustom": true,
  "Description": "Netskope CSA",
  "Actions": ["Microsoft.Web/sites/config/list/action", "Microsoft.Network/networkWatchers/queryFlowLogStatus/action"],
  "NotActions": [],
  "DataActions": [],
  "NotDataActions": [],
  "AssignableScopes": ["/subscriptions/<subscription-id>"]
}
Replace the <subscription-id> with the actual value. To get the <subscription-id>:
Navigate to All services > General > Subscriptions.
Copy the subscription ID and replace the <subscription-id> parameter with the copied ID.
Next, use the Azure PowerShell. Click the Cloud Shell icon on the top-center bar of the Azure portal page.
Note
The shell may prompt you to create and mount a storage account.
On the PowerShell top navigation, select the Upload/Download files icon and then Upload.

Upload the NetskopCSA.json file. Then, on the PowerShell prompt, enter the following command:
New-AzRoleDefinition -InputFile "NetskopeCSA.json"
When you run this command, Azure creates a custom role Netskope CSA Custom Role with the Microsoft.Network/networkWatchers/queryFlowLogStatus/action and Microsoft.Web/sites/config/list/action permissions.
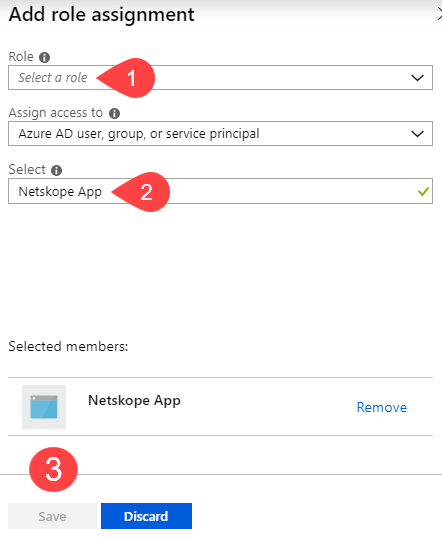
Under Roles, assign the Reader and Netskope CSA Custom Role.
Note
If you have multiple subscriptions, you can group them under a Management Group and assign the role at the Management Group.
Note
As part of continuous security assessment, if you need Netskope to assess Key Vault, see "Step-6: Assess Key Vault" section in Step 1/3: Configure an Azure AD Application for CSA article.
Keep the Assign access to Azure AD user, group, or service principal.
Under Select, search for the newly created Azure AD application and select it.

Click Save.