Netskope IPSec with Cisco Meraki MX
Netskope Intelligent Security Service Edge (SSE) is fast, easy to use, and secures your transactions wherever your people and data go. Netskope SSE converges security capabilities into a single cloud platform to allow a central unified security policy for all users across the organization both on premises or working remotely. This guide illustrates how to configure all internet bound traffic to be routed to the Netskope SSE through an IPSec tunnel for traffic inspection, content filtering, data and threat protection.
To learn more about the steps in the Meraki MX and Umbrella Secure Internet Gateway (SIG): MX documentation.
Note
Cisco Meraki MX routers don't support policy-based forwarding and policy-based routing.
Prerequisites
Before configuring an IPSec tunnel with Cisco Meraki MX, ensure you have the following:
Netskope NG-SWG with the Cloud Firewall license.
Cisco Meraki MX requires MX 15.12+ firmware, on which users are able to configure the Non-Meraki VPN Peer with the two following Umbrella requirements:
Choose IKE version type on each Non-Meraki VPN Peer. When choosing IKEv2, the Local ID field will be enabled. The Netskope IPSec config Source Identity info needs to be added into this field.
On IPSec policies, choose Diffie-Hellman group 14.
Creating IPSec Tunnels in Netskope
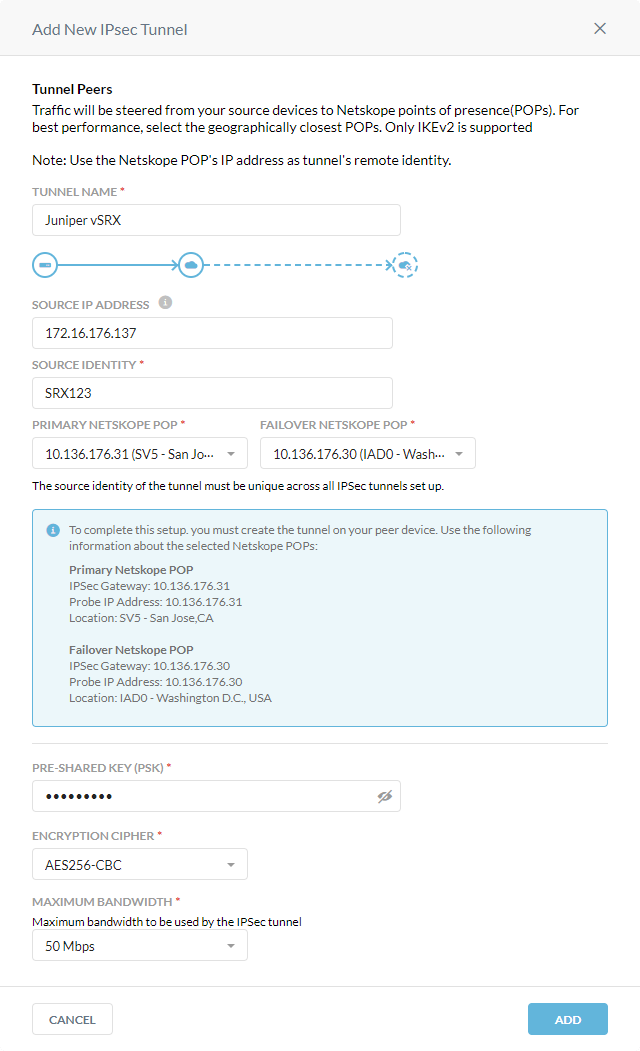
To create the IPSec tunnels for Cisco Meraki MX in the Netskope UI:
Go to Settings > Security Cloud Platform > IPSec.
Click Add New Tunnel.
In the Add New IPSec Tunnel window:
Tunnel Name: Enter a name for the IPSec tunnel.
Source IP Address: (Optional) Enter the source peer IP address (i.e., exit public IP) of the Cisco router that Netskope will receive packets from. Netskope identifies traffic belonging to your organization through your router or firewall IP addresses.
Source Identity: Enter an IP address, a fully-qualified domain name (FQDN), or an ID in email address format. For example, 1.1.1.1 or sourcelocation@company.com. The router or firewall uses the source identity for authentication during Internet Key Exchange (IKE). This doesn't need to be a real DNS record.
Primary Netskope POP: Select the primary Netskope point of presence (POP) closest to you, and copy the IPSec Gateway IP address. You need this information to establish the primary IPSec tunnel on your Cisco router. For optimal performance, Netskope recommends using the geographically closest POPs and configuring at least two tunnels for each egress location in your network.
Failover Netskope POP: Select the backup Netskope POP closest to you, and copy the IPSec Gateway IP address. You need this information to establish the backup IPSec tunnel on your Cisco router. For optimal performance, Netskope recommends using the geographically closest POPs and configuring at least two tunnels for each egress location in your network.
Pre-Shared Key (PSK): Enter the pre-shared key that both sides of the tunnel will use to authenticate one another. The PSK must be unique for each tunnel.
Encryption Cipher: Select AES256-CBC as the encryption algorithm for the IPSec tunnel.
Maximum Bandwidth: Enter the maximum bandwidth for the IPSec tunnel. The tunnel size can be up to 1 Gbps. To enable the 1 Gbps option, contact your Sales Representative.
Advanced Settings: Click to view the following options.
Rekey: Select to rekey SAs when they expire. Netskope recommends using the default setting.
Reauthentication: Select to create new IKE and IPSec SAs when they expire. Netskope recommends using the default setting.
Trust X-Forwarded-For Header: Select to trust IP addresses contained in the X-Forwarded-For (XFF) HTTP header at the tunnel level. If you trust XFF at the tenant level, you can't select this option.
Apply to all traffic: Use the XFF HTTP header to identify all user traffic going through the IPSec tunnel.
Apply to specific NAT/proxy IP(s): Use the XFF HTTP header to identify traffic from specific NAT and proxy IP addresses going through the IPSec tunnel. Click +Add Another to add multiple IP addresses.

Click Add.
The IPSec tunnel configuration contains a pending status.
 |
Configuring IPSec Tunnels in Cisco Meraki MX
To create the IPSec tunnels in the Cisco Meraki MX UI:
Go to Security & SD-WAN > Site-to-site VPN.
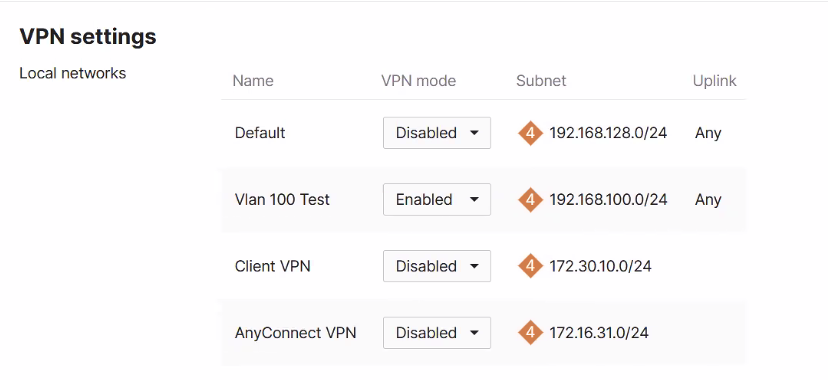
In VPN settings, select the subnets you want to participate in the Netskope SSE VPN.

In Organization-wide settings, for Non-Meraki VPN peers, click Add a peer.

Enter the following peer information:
Name: Enter a name for the tunnel.
Public IP: Enter the primary IPSec gateway IP address of the Netskope POP.
Local ID: Enter the source identity IP address you configured for the Netskope IPSec tunnel.
Private subnets: Enter
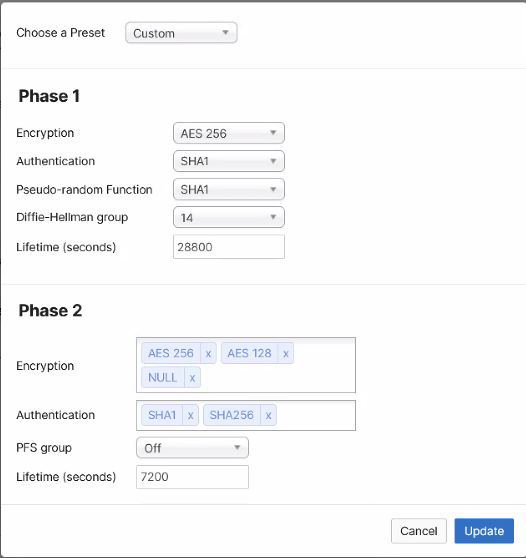
0.0.0.0/0to redirect all internet-bound traffic into the IPSec tunnel.IPSec policies: Choose a Custom Preset to configure the IPSec Phase 1 and Phase 2 encryption ciphers.
Preshared secret: Enter the same PSK you configured for the Netskope IPSec tunnel.
Availability: Enter a Network tag that you want to apply to the network where the MX router is assigned to.
Configure the IPSec connection parameters below. Ensure you use AES 256 encryption, Diffie-Helman group 14 for the key exchange, Phase 1 lifetime 28800 seconds and Phase 2 lifetime 7200 seconds.

You must generate traffic through the tunnel so the correct tunnel status reflects on the Cisco Meraki dashboard. Go to Security & SD-WAN > Appliance Status > Tools to generate traffic and source pings from a VPN-participating VLAN to the destination IP address that uses the IPSec tunnel route.

Troubleshooting
To verify your IPSec tunnel on the CIsco Meraki dashboard, go to Security & SD-WAN > VPN Status, and you should see an active Netskope SSE IPSec tunnel.

To verify your IPSec tunnel in the Netskope UI, go to Settings > Security Cloud Platform > IPSec, and you should see the IPSec tunnel display an up status with a throughput greater than 0 Kbps.

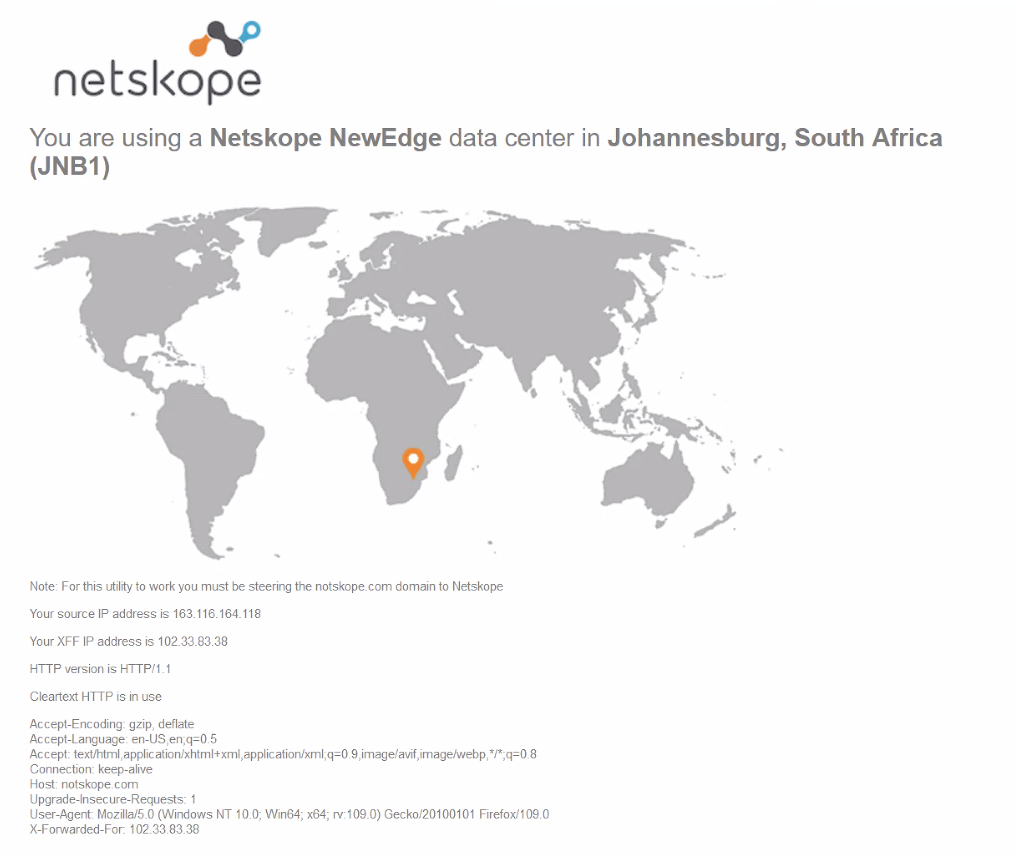
You can also validate if the web traffic is sent through Netskope SSE by visiting http://notskope.com from a web browser on an endpoint connected to the VLAN with traffic steered to the 3rd party IPSec tunnel.
