Configure Browser Access for Private Apps
Browser Access is an additional method through which users can access enterprise internal web applications over HTTP/HTTPS. Users can also access non HTTP/HTTPS internal applications using the Netskope Client.
Prerequisites
You must have an active Identity Provider (IdP) account and have privileges to modify settings in your IdP account that will direct traffic to Netskope.
Browser Access requires that the hostname in the originating HTTP request matches the hostname expected by the Application server. Browser Access only supports HTTP/1.1, HTTP/2, and TLS 1.2. TLS 1.3 and HTTP/3 are not supported.
Workflow
Create a SAML Reverse Proxy account in the Netskope UI, and then update your IdP account with the Netskope ACS URL and Audience URL.
Create a Real-time Protection policy to grant users browser access to Private Apps.
You will need your IdP SSO URL and certificate to complete these steps.
Log in to the Netskope UI.
Go to Settings > Security Cloud Platform and click SAML (under Reverse Proxy).
Click Add Account.
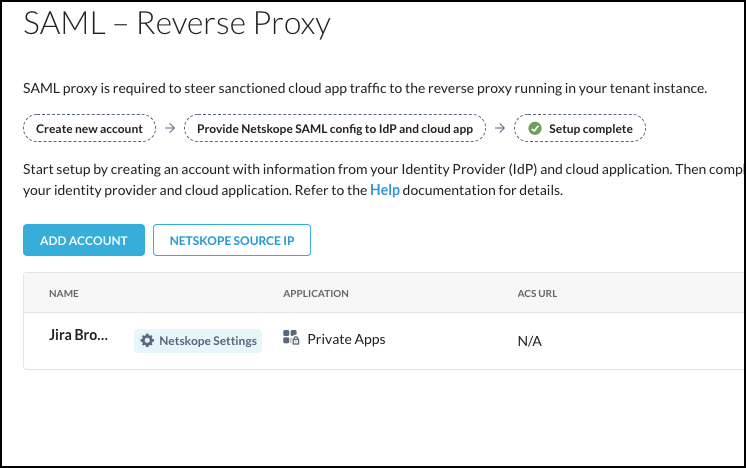
In the New Account window, enter a name for the account.
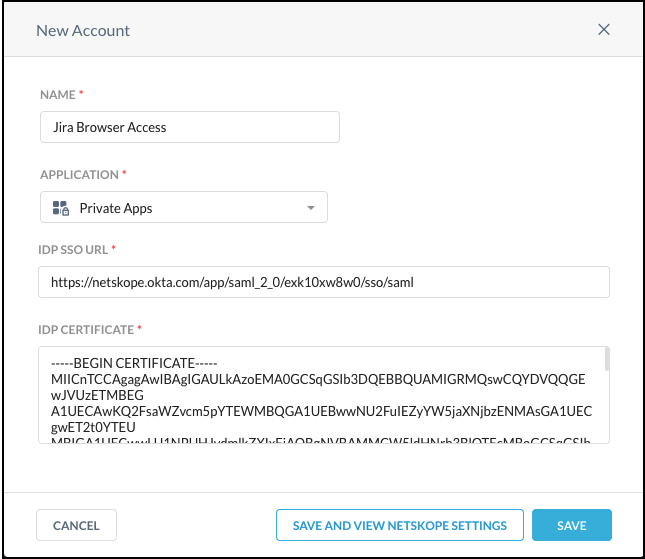
Select Private Apps from the Application dropdown list.
Enter these parameters:
IdP SSO URL: Enter your IdP SSO URL.
IdP Certificate: Enter your IdP certificate.
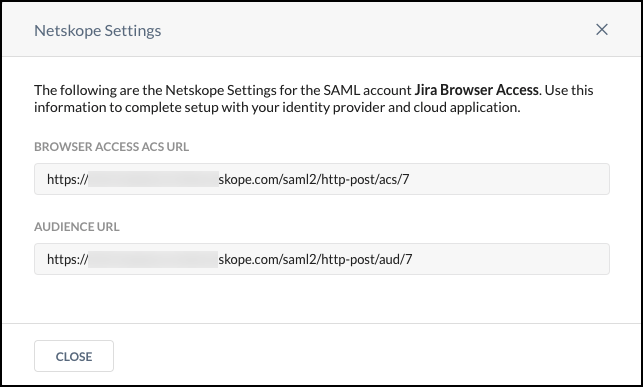
Click Save and View Netskope Settings to see the URLs for this account. Copy the Browser Access ACS URL and Audience URL to use in your IdP account. Update your IdP account with these URLs before proceeding.
These instructions are for new and existing Private Apps.
Go to Settings > Security Cloud Platform > App Definition and click Private Apps.
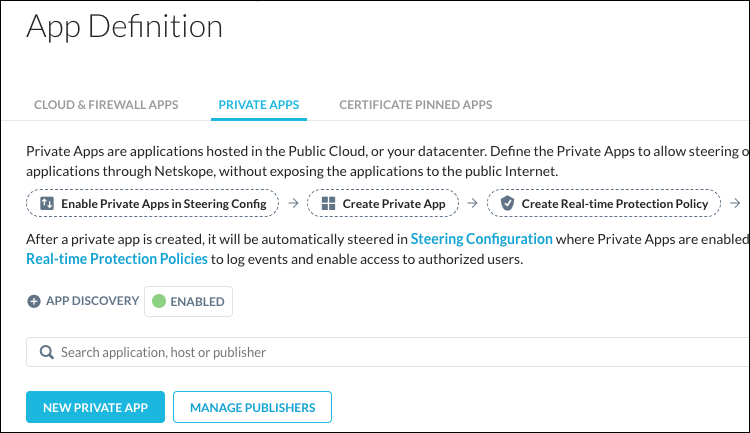
Click New Private App to create a new private app, or select an existing app (and jump to step 4).
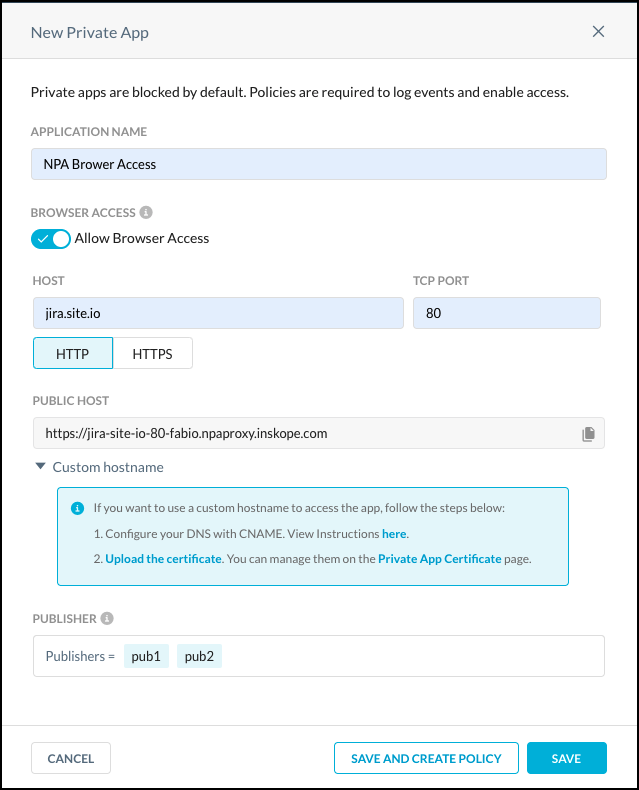
Enter a meaningful app name in the Application Name field.
Enable Allow Browser Access.
Enter the Host domain in the Host field (like
jira.site.io). The Host field supports the following syntax: Host (jira.site.io). Only one host can be added. Browser Access does not support wildcards in host names. Next add a TCP port number.After adding the hostname and port, the Public Host URL is displayed. This is the URL by which properly authenticated users can access the private app. You can copy the public host name by clicking the copy icon
 .
.Select HTTP or HTTPS. For HTTPS, the private app must either use a certificate that is signed by a trusted certificate authority, or you must select the Trusted self-signed certificate option.
Note
Netskope supports self-signed trusted root certificates. Cross-signed root certificates are not supported in the certificate chain file. To learn more, go here.
A Private App can be accessed via a browser in two ways:
Using the generated hostname from the Public Host field.
Note
You can use the public host name for your custom host name in your DNS system. Create a DNS record, select the CNAME type, and then add your public host name.
Creating a custom hostname and uploading a certificate and key pair for the private host. Click the Custom Hostname toggle, and then click Upload the Certificate to open a page to enter your certificate and key.
Note
You will need to upload the certificate and key for the custom host name. Click the Custom Hostname toggle, and then click Upload the Certificate to open a page to enter your certificate and key.
The server cert should be on top, followed by the rest of the chain, with the root cert at the bottom.
For more information about certificates, refer to Configuring Certificates for Private Apps Browser Access.
Click in the Publisher text field and select one or more Publishers from the dropdown list.
Tip
For high-availability, add multiple publishers for each private app. Up to 16 Publishers can be used per app.
Click Save.
Connecting the private app to the publisher may take several minutes. Make sure that you see the green icon  for this private app before proceeding. If the badge is red, use the Troubleshooter feature or check your firewall rules before proceeding.
Note
When a user has access to a private app on different tenants using Netskope-encoded Private App URLs from the same browser, then after accessing the Private App on one tenant, a user will need to clear the cookies from the browser before being able to access the Private App on a different tenant.
You need to create a Real-time Protection policy in order to allow Browser Access to Private Apps.
Go to Policies > Real-time Protection.
Click New policy and select Private App Access.
For Source, select the Users, OU, or Groups for which you want to grant access to the private app(s).
For Access Method, select Browser Access. At least one Access Method must be defined, either Browser Access or Client.
If Browser Access is used, Client users will not be able to access Browser Access Private Apps. If Client is used, Client users and Browser Access users will have access to Private Apps.
If Access Method is not showing, click Add Criteria to search for and select Access Method, and then select Browser Access.
For Destination, leave Private App and select your private app from the dropdown list.
For Action, select Allow to grant access. To deny access, select Block, select a policy notification template from the dropdown list, or create one.
Give the policy a name (like
Browser Access for JIRA), and then click Email Notification to choose the notification template for the policy. When finished, click Save.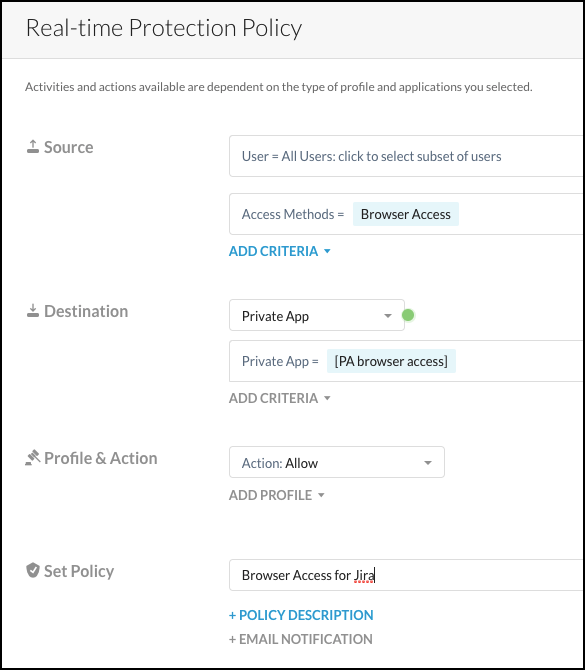
Click Apply Changes.
Browser Access provides the ability to terminate a user's active session. Go to Skope IT > Users, click the menu icon  for a user, and then click Clear Private App Auth to clear the user's browser access authentication information. As a result, the user will need to re-authenticate to access the private app.