IPSec
Note
The new IPSec page is currently in Beta. Contact your Sales Representative or Support to enable it. If you're using the previous IPSec page, see IPSec.
Internet Protocol Security (IPSec) is a tunneling protocol for authenticating and encrypting packets inside a transport protocol. IPSec functions like a VPN but with encryption; it transports packets from one endpoint to another endpoint. IPSec has two modes, tunnel mode and transport mode. These instructions are for tunnel mode.
IPSec can steer HTTP(S) and non-HTTP(S) traffic to the Netskope cloud. Configure the source peer IPSec device to send traffic over the IPSec VPN tunnel. The Netskope IPSec gateway validates the source identity of the tunnel configured in the Netskope admin console. If the tunnel identity is not known, the tunnel is not established.
The following diagram illustrates the traffic workflow for IPSec tunnels with Netskope Secure Web Gateway:

Additionally, if you have Netskope Cloud Firewall, you can steer non-HTTP(S) traffic through the IPSec tunnels to the Netskope cloud:

General Guidelines
When creating or editing an IPSec tunnel, consider the following:
Configure your source peer devices (i.e., routers or firewalls) to establish the IPSec tunnel. To learn more, see your router or firewall documentation.
For Cisco routers, you can use IPSLA or keepalives on the Cisco tunnel interface to monitor the tunnels.
For Juniper routers, you can use real-time performance monitoring (RPM) to monitor the VPNs.
Configure your firewalls to allow the IPSec tunnel. If your firewall has an ACL blocking inbound connections, configure a rule to allow IPSec traffic. To learn more, see your firewall documentation.
Ensure you install the Netskope Client on your users' devices. If not, go to Settings > Manage > Certificates to download the Netskope root certificate and distribute it to your users' devices. This is optional for Netskope Cloud Firewall.
Ensure you have a Netskope Secure Web Gateway or Netskope Cloud Firewall license, which is required to use IPSec.
Send HTTP/HTTPS traffic on ports 80 and 443 through the IPSec tunnel. Netskope also supports custom ports. If you have the Cloud Firewall license, you can also send non-HTTP(S) traffic through the tunnel.
Note
Netskope negotiates HTTP/2 for all domains if the origin server supports it; otherwise, Netskope fallbacks to HTTP 1.1. All other traffic will continue to leverage HTTP 1.1. In addition, the Netskope Client, GRE/IPSec, and iOS access methods are fully supported. The protocol change is completely transparent to users, no configuration is required by admins. Contact Support to enable this feature for your account.
On the tunnel source device, ensure that the IPSec and IKE SA rekey time intervals are at least less than 10 minutes than the default values of 120 (IPSec SA) and 1440 (IKE SA). Netskope recommends having traffic from the endpoint at least every 30 minutes.
Send Voice over Internet Protocol (VoIP) data ports directly to the internet.
You must enable network address translation traversal (NAT-T). Netskope does not support implementing NAT for endpoints inside an IPSec tunnel.
You must configure failover to a backup tunnel to ensure minimal connection interruptions.
Netskope strongly recommends enabling ICMP keepalive probing and IKE Dead Peer Detection (DPD) for each tunnel on the router or firewall. Enabling these features ensures a reliable status output in the Netsope UI especially if tunnel failure occurs.
Traffic from the same user or endpoint must go through the same tunnel, and you can't load balance it across tunnels.
Netskope doesn't recommend configuring make-before-break (MBB) tunnel reauthentication semantics at the peer gateways because it can cause interoperability issues.
Supported IPSec IKEv2 Parameters
Netskope only supports IKEv2. The maximum number of Child SAs per IKE connection at one time is 10. Below is a list of Netskope supported IKEv2 ciphers. Netskope recommends using the ones in bold.
Components | Phase 1 | Phase 2 |
|---|---|---|
Encryption | AES-128-CBC AES-192-CBC AES-256-CBC | AES-128-CBC AES-256-CBC AES-128-GCM AES-192-GCM AES-256-GCM NULL |
Integrity | SHA-1 SHA-256 SHA-384 SHA-512 | SHA-1 SHA-256 SHA-384 SHA-512 |
Authentication | Pre-Shared Key (PSK) | N/A |
Diffie-Hellman Group | 14 15 16 18 | 14 15 16 18 |
SA Lifetime | 24 hours | 2 hours |
Total Child SAs Supported | N/A | 10 |
Perfect Forward Secrecy (PFS) | N/A |
|
NAT-Traversal (NAT-T) |
| N/A |
Dead Peer Detection (DPD) |
| N/A |
Configuring IPSec Tunnels
You must configure IPSec tunnels from your router/firewall to at least two different Netskope POPs. This ensures resiliency for tunneling traffic through IPSec in the event one of the two identity source peers is temporarily not available. The backup IPSec tunnel takes over until the primary tunnel gets restored.
To configure IPSec tunnels for your organization:
Configure the IPSec tunnels in the Netskope UI to direct traffic to the the Netskope POPs. The POP addresses are available in the Netskope admin console at Settings > Security Cloud Platform > Traffic Steering > IPSec > Netskope POPs. To learn more: Creating an IPSec Site and Netskope IPSec Steering - Part 1 - Initial Setup.
Configure the IPSec tunnels for your vendor's source identity devices. Use policy-based routing to steer HTTP/HTTPS traffic on ports 80 and 443 through the IPSec tunnels. If you have the Cloud Firewall license, you can also steer non-HTTP(s) traffic like TCP, UDP, and ICMP through the tunnels. To see vendor specific integration guides: IPSec and GRE.
After configuring the IPSec tunnels, choose steering/identity options, such as installing the Netskope Client or provisioning the Netskope root certificate on devices. To learn more: User Identity Methods for IPSec and GRE Tunnels and Netskope IPSec Steering - Part 3 - Enable Forward Proxy for SAML Authentication.
When traffic is directed through the Netskope cloud, you can manage the connections and create policies in the Netskope UI. To learn more: Netskope IPSec Steering - Part 2 - Create a Sample Policy.
To watch videos about IPSec setup, steering, and use, go to: Netskope Microlearning Videos
About the IPSec Page
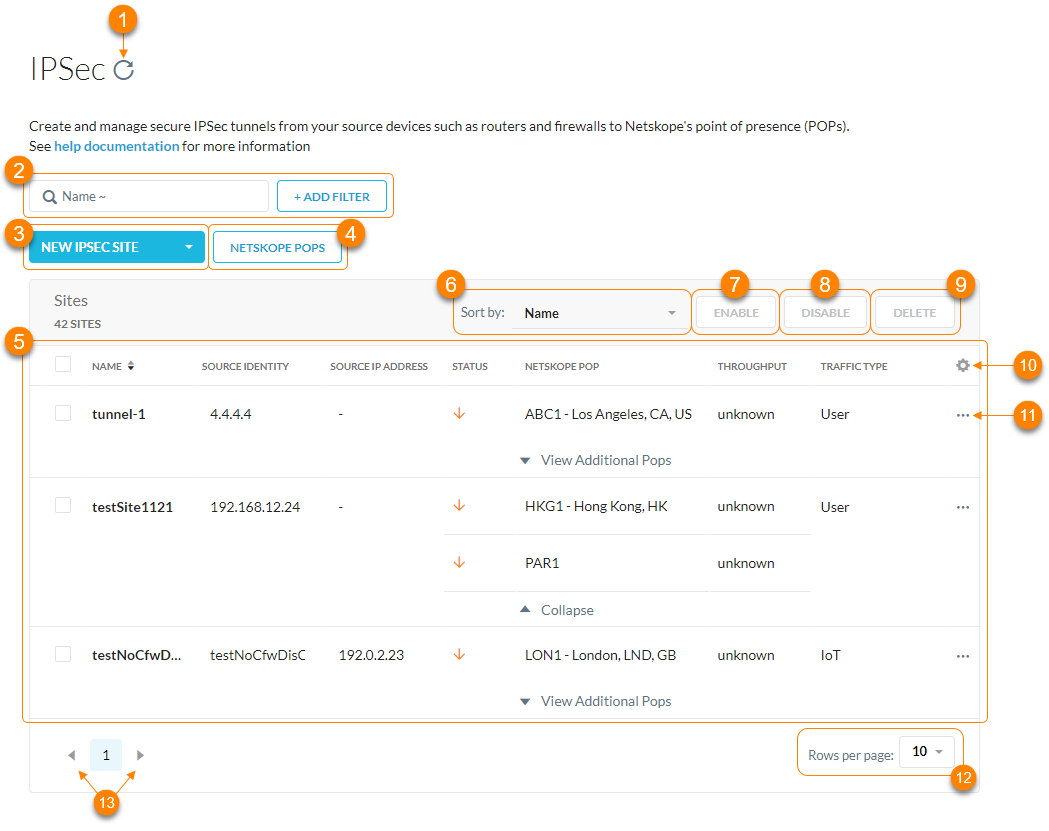
On the Steering Configuration page (Settings > Security Cloud Platform > IPSec), you can:
Refresh the IPSec site configurations.
Search and filter the IPSec sites by name. Click + Add Filter to add other filters to narrow your search results by:
Source Identity
Status
Netskope POP
Traffic Type
Create a new IPSec site or import multiple IPSec sites using a CSV file.
View the Netskope POP list and the following information for each one:
Gateway: The gateway IP address.
Probe IP Address: The probe IP address.
Location: Its geographical location.
You can also see if a Netskope POP isn't accepting new tunnels.
View a list of IPSec sites. For each site, you can see the following information:
Name: The name of the IPSec site.
Source Identity: The IP address, FQDN, or ID in email address format that the router or firewall uses for authentication during Internet Key Exchange (IKE).
Source IP Address: The source peer IP address (i.e., exit public IP) of the router or firewall that Netskope will receive packets from. Netskope identifies traffic belonging to your organization through your router or firewall IP addresses.
Status: The status of the IPSec site.
 : The IPSec site is observing keepalive packets from the router or firewall.
 : In the last minute, the IPSec site hasn't observed any keepalive packets from the router or firewall. If the tunnel is down, Netskope continues to process the tunnel packet.
 : The IPSec site is disabled.
Tunnel status is displayed as up or down based on the RFC DPD standards. You can enable your tunnel as a permanent tunnel. However, to ensure the Netskope UI displays reliable tunnel states, especially if a tunnel failure occurs, Netskope recommends enabling ICMP keepalive probing or DPD for each tunnel on the device, including the failover to the backup tunnel.
Netskope POP: The primary Netskope POP associated with the IPSec site. Click View Additional Pops to view the backup POPs.
Throughput: The IPSec site throughput in kilobytes per second (Kbps).
Traffic Type: The type of traffic traversing the IPSec site.
User
IoT
Mixed
Machine
Guest Wifi
Sort the table by site name.
Select at least one override using the checkbox and click Enable to enable it.
Select at least one override using the checkbox and click Disable to disable it.
Select at least one override using the checkbox and click Delete to delete it.
Click
 to customize table columns or restore the default ones.
Click
 to choose one of the following options:
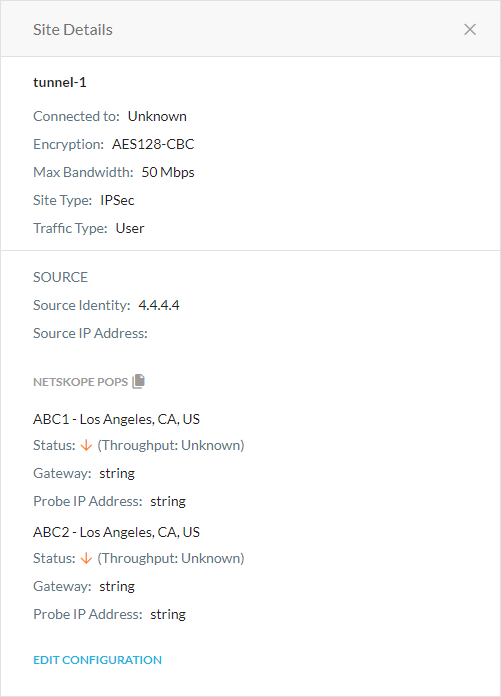
View Detail: View comprehensive details on the IPSec site.

Edit: Modify the IPSec site and its settings. To learn more: Creating an IPSec Site.
Enable: Enable the IPSec site.
Disable: Disable the IPSec site.
Delete: Delete the IPSec site.
View up to 100 sites per page.
View multiple pages of the table.

