Configure Additional Tunnels on EdgeConnect
To enable the active - active breakout scenario, you will create two additional IPSec tunnels to the same primary POP and the same failover POP from a secondary internet interface on your EdgeConnect appliance.
Log in to Silver Peak Unity Orchestrator.
In the device tree on the left, select the EdgeConnect appliance where you want to configure the tunnel to Netskope.
Open the Tunnels tab (click Configuration > Networking > Tunnels > Tunnels).
 Click the edit icon to the left of any row in the table of tunnels.
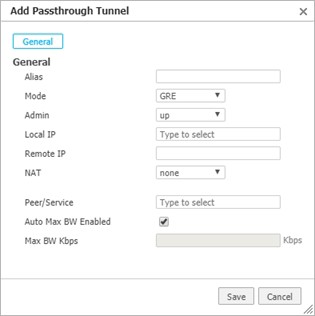
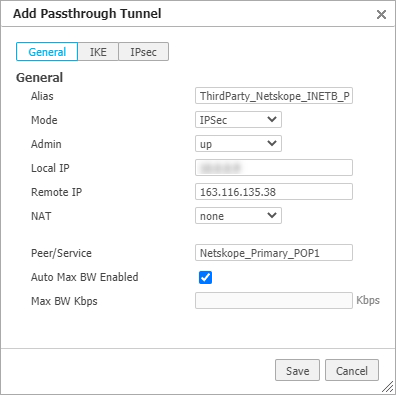
On the tunnels detail page, click the Passthrough button at the top of the table, and then click the Add Tunnel button. The Add Passthrough Tunnel dialog appears.

Enter or select the new tunnel parameters as follows:
Parameter
Description
Alias
Enter a descriptive name for the tunnel.
Mode
Select IPSec.
Admin
The administrative state of the tunnel. You can leave this at the default value of up.
Local IP
The IP address of the WAN interface that will originate the IPSec tunnel. This should be the WAN interface associated with your second ISP.
Remote IP
Enter the IP address of the primary Netskope POP that you configured in Netskope.
NAT
This should be set to none.
Peer/Service
Enter the same service that was used for the first EdgeConnect tunnel.
Auto Max BW Enabled
Leave this checkbox selected to let the appliance auto-negotiate the maximum tunnel bandwidth.
Max
BW Kbps
This field is not available when auto bandwidth is enabled.

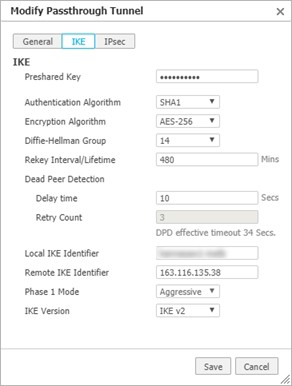
Click IKE in the Add Passthrough Tunnel dialog.
Enter or select the new tunnel parameters as follows:
Set the IKE Version to IKE v2 first as it will change some of the other fields available.
Parameter
Description
IKE Version
Set this to IKE v2.
Preshared Key
Enter the same preshared key that you created on Netskope.
Authentication Algorithm
Select SHA1.
Encryption Algorithm
Select the same algorithm as on Netskope (AES-128 or AES-256).
Diffie-Hellman Group
Select 14.
Rekey Interval/Lifetime
Leave this at the default value of 480.
Dead Peer Detection
You can leave the delay time at its default value, and retry count cannot be changed.
Local IKE Identifier
Enter the Source Identity that you assigned to the second tunnel on Netskope.
Remote
IKE Identifier
Enter the IP address of the primary Netskope POP that you configured in Netskope.
Phase 1 Mode
This value cannot be changed.

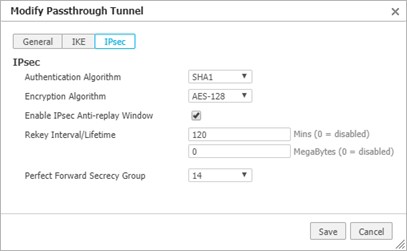
Click IPSec in the Add Passthrough Tunnel dialog.
Enter or select the new tunnel parameters as follows:
Parameter
Description
Authentication Algorithm
Select SHA1.
Encryption Algorithm
Select AES-128.
Enable IPsec Anti-Replay Window
Leave this checkbox selected.
Rekey Interval/Lifetime
You can leave these values at their defaults.
Perfect Forward Secrecy Group
This can be left at the default value of 14.

When the settings for General, IKE, and IPsec are complete, click Save to create the new tunnel.
Click Add Tunnel to create a second tunnel to the failover POP.
Use the same values that you used for the first tunnel except for the following:
Alias: Use a different name for the second Silver Peak tunnel.
Remote IP: Enter the IP address of the failover POP that you configured in Netskope.
Peer/Service: Enter the same service name to direct traffic to the failover POP (same as the second EdgeConnect tunnel).
Remote IKE Identifier: Use the IP address of the failover POP.
After creating the IPsec tunnels from the EdgeConnect appliance to the primary and failover POPs using ISP1 and ISP2, there are no additional changes to be made to the existing BIO. Proceed to, Configure Business Intent Overlay Policies if needed.