Integrate with Websense DLP
Overview
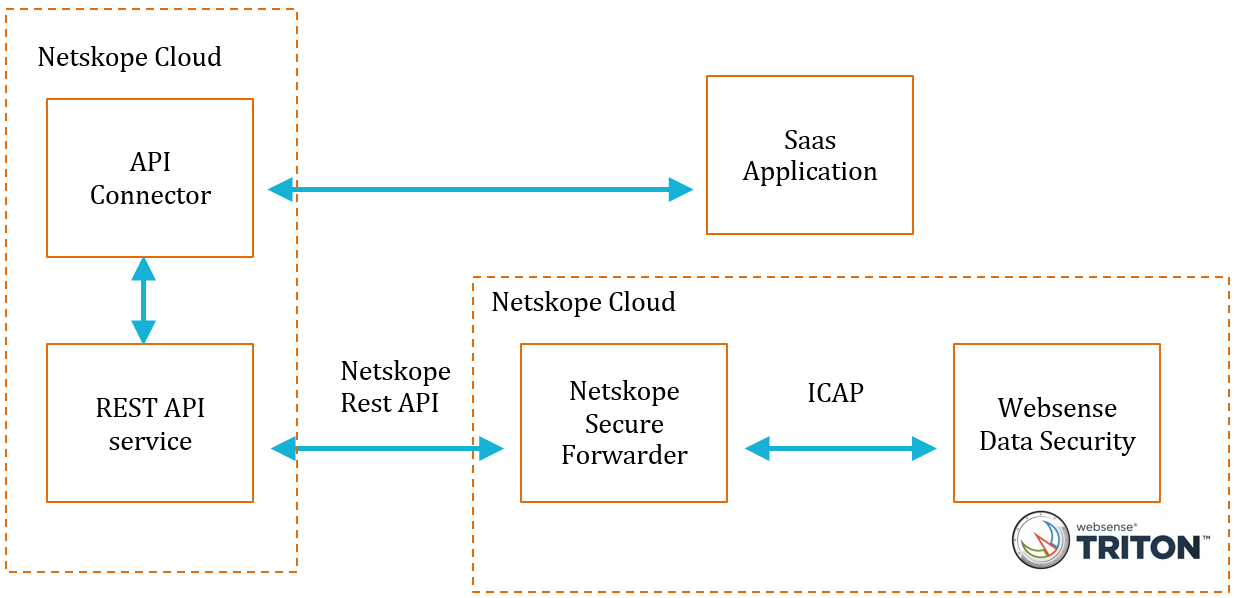
Netskope offers the capability to leverage your existing Websense DLP investment by integrating with the Netskope cloud solution. Netskope performs a first pass of DLP scanning of unstructured content in the cloud and sends the documents to the on premises Websense Data-Security solution for the final verdict.
The general workflow includes:
Netskope initially scans content destined for SaaS applications. Files that trigger DLP violations are quarantined to a sanctioned app using the API Connector service.
Netskope's Secure Forwarder is a virtual appliance, which exists in the customer premises and monitors for such quarantined files.
The Netskope system exposes several REST APIs to get the list of quarantined files in a specified period, download a quarantined file and take action (Allow or Block) on a specified quarantined file.
A service on the Secure Forwarder polls for the list of quarantined files which have not yet been acted upon and then for each such file, downloads the file and invokes an ICAP client in order to relay this content to the ICAP server of Websense Data-Security in the customer's environment.
The Websense Data-Security replies back with an Allow or Block response encapsulated in the ICAP protocol. The service on the Secure Forwarder decapsulates the ICAP protocol headers and then takes action to allow or block the file as the case maybe, using the aforementioned Netskope REST APIs.
Workflow
The following diagram shows the integration workflow.
 |
Prerequisites
You can use this feature with the N1000, N2000, or N5000 appliances or the Secure Forwarder (virtual appliance) version 2.32 or greater. You must have admin rights and have the other set up complete and operational before starting the integration.
Deploy the Secure forwarder in the same network as the Websense DSS protector.
Websense Data-Security Configuration
In the Triton admin console, go to the Data-Security > Settings page.
Click on the ICAP server under System Modules
Check the box to enable ICAP on Websense Data-Security.
See Websense documentation here for additional details regarding enabling ICAP.
Netskope Configuration
Follow the steps outlined below to enable the DLP engine.
Note
Refer to your Websense Data-Security documentation for the reqmod and respmod URI endpoints.
Command | Description |
|---|---|
enable | This command enables the DLP client to run content through the On-Premises DLP engine via the ICAP protocol. |
Reqmod-uri | URI for the REQMOD service of the On-Premises DLP engine. For example: |
Respmod-uri | URI for the RESPMOD service of the On-Premises DLP engine For example: |
Access the system console using ssh.
Log in to the system using your admin credentials. Ensure you have accessed the nsshell.
Enter
configureto initiate the nsshell configure mode.Enter the following configuration commands:
set dataplane dlp-engine enable trueset dataplane dlp-engine reqmod-uri <URI>set dataplane dlp-engine respmod-uri <URI>
Enter
show dataplane dlp-engineto check your work.Enter
saveto save your changes.Enter
exitto leave the configure mode.Enter
exitto leave the nsshell and exit the console.
Secure Forwarder Example Configuration
# set dataplane dlp-engine enable true
# set dataplane dlp-engine reqmod-uri icap://172.16.11.100/reqmod
# set dataplane dlp-engine respmod-uri icap://172.16.11.100/respmod
# save
Configuration saved
No bypass domain list configured...
Restarting dlpclient service
#