MobileIron Core
Netskope supports using MobileIron Core for mobile device management (MDM) to allow iOS devices access to the Netskope cloud using the on-demand VPN mode. This document explains how to deploy Netskope for iOS devices using the on-demand and per-app VPN mode, and how to deploy Android Managed Configurations.
Note
Refer to your MobileIron Administration guide for additional help.
Prerequisites
To deploy MobileIron for iOS VPN, you can get the Netskope Root and Intermediate CA certificates from Netskope, or use your own Root and Intermediate certificates.
In the Netskope tenant UI, go to Settings > Security Cloud Platform > Netskope Client > MDM Distribution. In the Certificate Setup section of this page, download the Netskope Root and Intermediate certificates. If using your own certificates, downloading these certificates are not necessary. In either case, copy the tenant OU and Organization Name here. These are needed when enrolling the local certificate.
In the Create VPN Configuration section, copy the VPN Server Name, Organization ID, and PAC URL. These are needed for configuring the VPN profile. This page also shows the current VPN mode configured. Optionally, your administrator can have the on-demand VPN function set to always on therefore not requiring the connection to be triggered each time.
In the Upload Certificate section, upload new certificates to Netskope, or view and replace an existing certificate using the icons to the right of the registered certificate.
The following sections explain how to upload and enroll certificates and how to configure an iOS profile for MobileIron Core for on-demand or per-app VPN. For information about iOS VPN fail-open, refer to iOS VPN Fail Open.
Upload and Enroll Certificates
To upload and enroll certificates for MobileIron on-demand and per-app VPN:
To upload the Local CA certificate, open the MobileIron Core UI and go to Services > Local CA > Add > Intermediate Enterprise CA.
Upload the CA certificate with the key in PFX format. Use either your own CA cert with key, or create a self-signed certificate in MobileIron (Services > Local CA > Add > Generate Self-Signed Certificate). Browse to and select the certificate file, enter a Local CA Name, and then click Upload Certificate.
Note
This Certificate has Root CA and Intermediate certificate in PFX format, and it is used by SCEP to issue end-user certificates at VPN Configuration setup while installing the profile on to the user's device. A Certificate Authority (CA) issues the end-user certificates.
To upload the Root certificate, go to Policies & Configs > Add New > Certificates. In the New Certificate Setting window, enter the certificate name and description, browse to and select the certificate file.
Note
While uploading a certificate, leave the Password and Confirm Password options empty. And if using the Netskope provided Root certificate, the file name is
rootcaCert.pem.When finished, click Save.
To upload the Intermediate CA certificate, repeat step 3. If using the Netskope provided Intermediate certificate, the file name is
caCert.pem.To configure the local certificate enrollment, go to Policies & Configs > Add New > Certificate Enrollment > Local.
Enter these parameters:
Name: Enter your Local Certificate Enrollment profile name. This is the VPN MobileIron configuration name.
Certificate Type: Select User Certificate.
Local CAs: Select the certificate that you uploaded in step 1 above.
Subject: Enter the following code string in this format:
emailAddress=$EMAIL$,CN=$EMAIL$,OU=<Tenant OU>,O=<Organization Name>,L=<Location>,ST=<State>,C=<Country>
Use the OU and O values from the Certificate Setup dialog box in the Netskope UI (Settings > Security Cloud Platform > Netskope Client > MDM Distribution).
Important
Location (L), State (ST), and country (C) must be unique for your CA.
Subject Common Name: Optional. To use, select from the dropdown list.
Key Usage: Optional. Choose to enable or disable.
Key Size:
2048CSR Signing Algorithm:
SHA1Note
Leave the remaining parameters unchanged.
Click Save.
Configure an On-Demand VPN Profile
To create an on-demand VPN profile:
In the MobileIron Core UI, go to Policies & Configs > Add New > VPN.
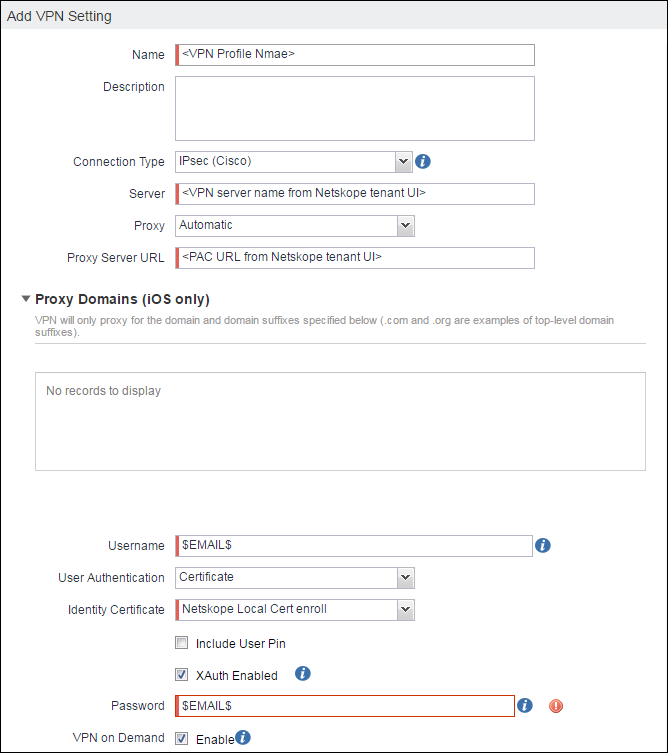
Enter these parameters:
Name: Enter your VPN connection profile name.
Connection Type:
IPSec (Cisco).Server: Enter the Netskope VPN server name from the VPN Configuration section in the Netskope UI (Settings > Security Cloud Platform > Netskope Client > MDM Distribution).
Proxy:
Automatic from ProxyProxy Server URL: Enter the PAC URL value from the VPN Configuration section in the Netskope UI.
Username:
$EMAIL$.User Authentication:
Certificate.Identity Certificate: Select the Certificate Name (defined in the Configuring Local Certification Enrollment section) from the dropdown list.
XAuth Enable: Enable the checkbox.
Password:
$EMAIL$.VPN On-Demand: Enable the checkbox. VPN starts whenever your users try to access the configured domain.
Scroll down to On-Demand Rules (iOS7 and later) and click Add+ to create the Domain Based Rules. These are the domains for which the on-demand VPN is triggered and must be configured for iOS7 and later devices.
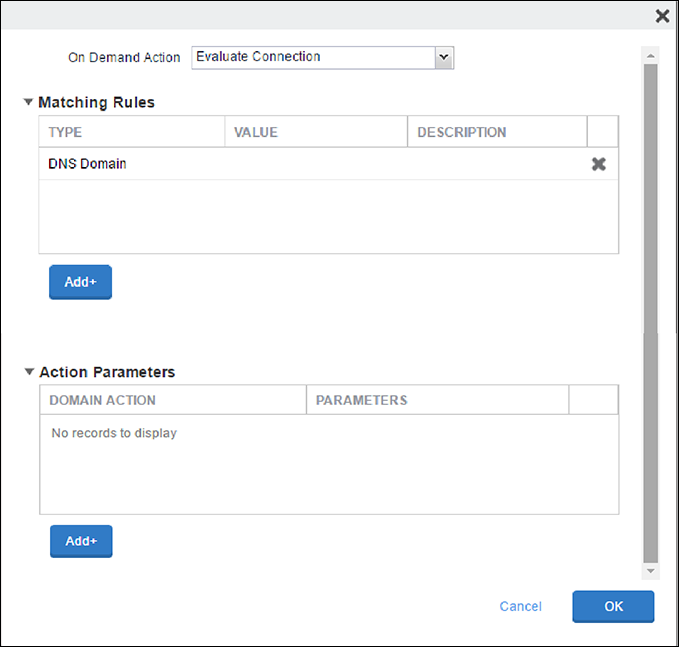
For On-Demand Action, select
Evaluate Connection.For matching rules, select URL String Probe and set the value from the MDM Distribution page in the Netskope UI.
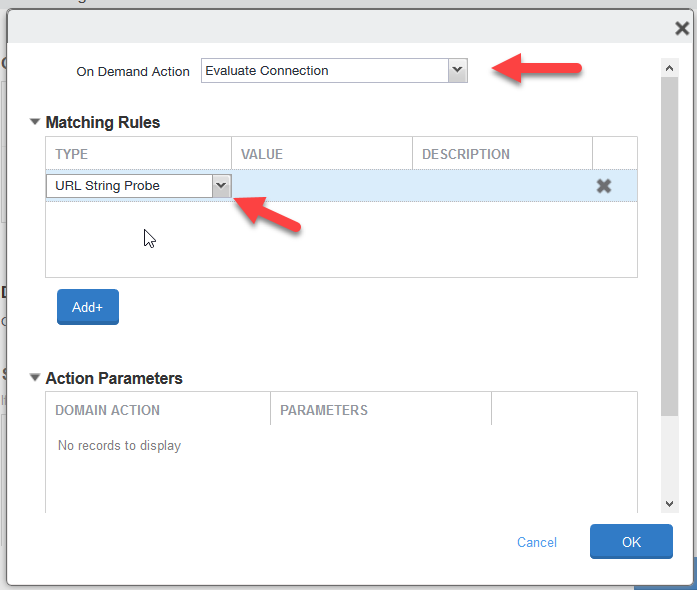
Click Add+ under the Action Parameters box.
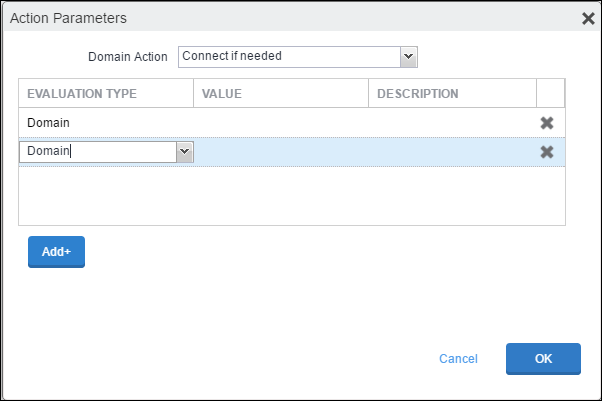
Domain Action:
Connect if needed.Click Add+, and then add the SaaS domain names. Get the domain names for each SaaS app from the MDM Distribution page by clicking Download Domain List in the Create VPN Configuration section.
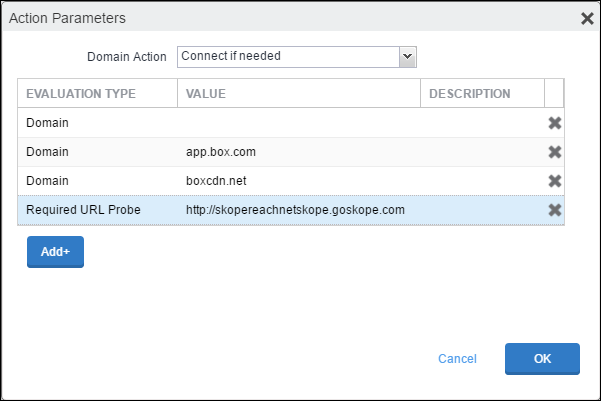
After adding the on-demand domains, add another entry for Required URL Probe with the value:
http://skopereachnetskope.goskope.com. Click OK.Set the Default Rule as Disconnect.
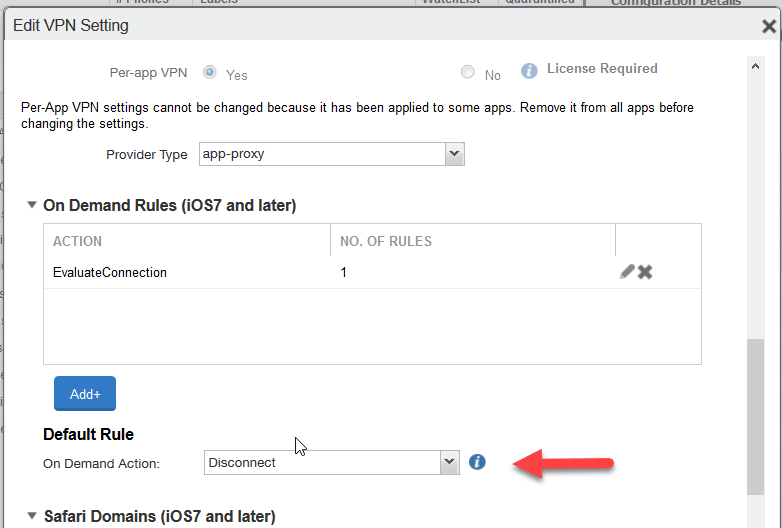
When finished, click Save.
Distribute to Devices
Select the following from the Policies & Configs page:
SCEP Profile Name
Netskope Root CA Public Key
Customer Intermediate CA Public Key
VPN Profile
Select Apply to Label in the More Actions dropdown list for devices. When the Apply to Label window opens, select iOS and click Apply.
To verify the VPN works, launch a managed app (like Box), and you should see the VPN icon at the top of the Status bar for iOS devices.
Configure the Per-App VPN Profile
By default all Netskope tenants are set to On-Demand iOS VPN. If you want to use the Per-App iOS VPN profile, contact your sales rep, professional services rep, customer success manager, or Support to have Per-App VPN enabled.
To configure a per-app VPN profile:
In the MobileIron Core UI, go to Policies & Configs > Add New > VPN.
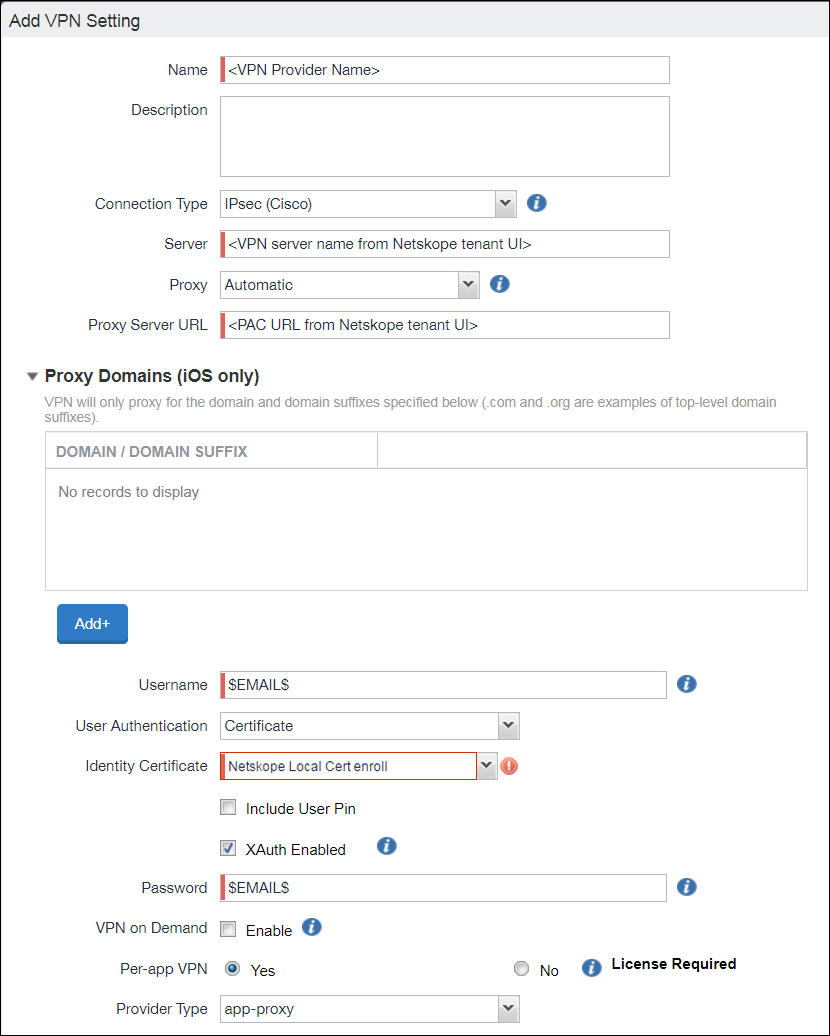
Enter these parameters:
Name: Enter your VPN connection profile name.
Connection Type:
IPSec (Cisco).Server: Enter the Netskope VPN server name from the VPN Configuration section in the Netskope UI (Settings > Security Cloud Platform > Client Profile > MDM Distribution).
Proxy:
AutomaticProxy Server URL: Enter the PAC URL value from the VPN Configuration dialog box in the Netskope UI.
Proxy Domains: Click Add+, and then add the SaaS domain names. Get the domain names for each SaaS app from the MDM Distribution page by clicking Download Domain List in the Create VPN Configuration section.
Username:
$EMAIL$.User Authentication:
Certificate.Identity Certificate: Select the Certificate Name (defined in the Configuring Local Certification Enrollment section) from the dropdown list.
XAuth Enable: Enable the checkbox.
Password:
$EMAIL$.Per-App VPN: Select Yes.
Provider Type: Use the default from the dropdown list.
When finished, click Save.
Distribute to Devices
Select the following from the Policies & Configs page:
SCEP Profile Name
Netskope Root CA Public Key
Customer Intermediate CA Public Key
VPN Profile
Select Apply to Label in the More Actions dropdown list for devices. When the Apply to Label window opens, select iOS and click Apply.
To verify the VPN works, launch a managed app (like Box), and you should see the VPN icon at the top of the Status bar for iOS devices.
iOS VPN Fail-Open
Fail open function allows traffic from a device using iOS VPN to bypass Netskope and directly go to an app or service. When fail open is enabled, all iOS devices will no longer steer traffic to Netskope. Fail open occurs when Netskope initiates it due to a service interruption and when an admin enables it in the Netskope UI.
To enable fail open for iOS VPN:
In the Netskope UI, go to Settings > Security Cloud Platform > MDM Distribution.
In the Create VPN Configuration section, confirm that your iOS VPN is operational. If so, click the
 icon to open the Advanced Configuration dialog box.
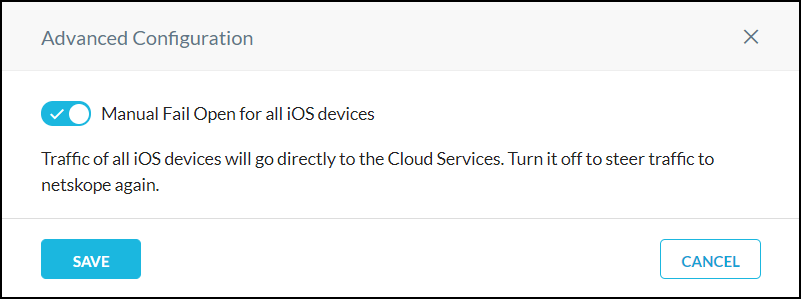
Enable the toggle and then click Save.
To use Android Managed Configurations in MobileIron Core, first set up Android for Work in Google. After Android for Work is configured, follow these instructions to configure Android Managed Configurations in MobileIron Core.
To configure Android Managed Configurations in MobileIron Core:
Log in to the MobileIron Core Admin Portal.
Click Apps.
On the App Catalog page, click Add+.
Click Google Play.
Enter
Netskopein the Application Name field, and then click Search.Select Netskope Cloud Director, and the click Next.
Add a new category, if desired, and then click Next.
Enable the Android for Work checkbox and enter these values:
User Email Address:
$EMAIL$.Host:
addon-<tenant hostname>.goskope.com.Token:
<OrgKey>. Use the Organization ID from the VPN Configuration section in the Netskope UI for theOrgKeyvalue (Settings > Security Cloud Platform > Netskope Client > MDM Distribution).Ns_MDM_Check (optional):
<ns_mdm_check value>. Used for Android device classification purposes. If you have not set up device classification for Android, you can ignore this field. If you have, in the Netskope UI, go to Settings > Manage > Device Classification, and select your Android device on the page. The ns_mdm_check value is shown in the Overview section.Click Finish.