GRE
Note
The following content shows the previous GRE page. If you're using the new one in Beta, see GRE.
Generic Routing Encapsulation (GRE) is a tunneling protocol for encapsulating packets inside a transport protocol. A GRE tunnel functions like a VPN but without encryption; it transports packets from one endpoint to another endpoint. A GRE capable router/firewall encapsulates a payload packet inside a GRE packet, which it then encapsulates in a transport protocol, such as IP, and sends over the internet.
GRE can steer HTTP(S) and non-HTTP(S) traffic to the Netskope cloud. The Netskope GRE gateway validates the source IP of the tunnel as a known IP address which must be configured in the Netskope UI.
Best Practices
To use GRE:
You must have the Netskope Secure Web Gateway or Netskope Cloud Firewall license.
Configure your source device to establish the GRE tunnel. See your router or firewall documentation for instructions.
Configure your firewalls, if any, to allow the GRE tunnel. If your firewall has an ACL blocking inbound connections, configure a rule to allow GRE traffic. See your firewall documentation for instructions.
If you are configuring Netskope Secure Web Gateway, only send HTTP (port 80) and HTTPS (port 443) through the GRE tunnel. You can also use non-standard or custom ports for HTTP and HTTPS traffic.
Note
Netskope negotiates HTTP/2 for all domains if the origin server supports it; otherwise, Netskope fallbacks to HTTP 1.1. All other traffic will continue to leverage HTTP 1.1. In addition, the Netskope Client and GRE / IPSEC and iOS access methods are fully supported. The protocol change is completely transparent to users, no configuration is required by admins. Contact Support to enable this feature in your account.
If you are configuring Netskope Cloud Firewall, send non-HTTP(S) traffic through the GRE tunnel. You can also use non-standard or custom ports for HTTP(S) traffic.
You cannot implement NAT for endpoints inside the GRE tunnel. If your source peer network uses NAT based on an endpoint IP address, the Netskope GRE service will observe only one IP address, and that will impact GRE load balancing, performance, reporting, and policy granularity. Your source peer network should not implement NAT on endpoint IP address.
The GRE gateway node can respond to ICMP probes/keep-alives only when the destination IP value in the inner IP packet matches the GRE gateway probe IP listed in the GRE gateway UI Dashboard corresponding to the Netskope POP. Otherwise, the probe packets are dropped by GRE.
Ensure the Netskope Client is installed on your users' devices. If not, go to Settings > Manage > Certificates to download the Netskope root certificate and distribute it to your users' devices. This prerequisite is optional for Netskope Cloud Firewall.
Calculate the maximum segment size (MSS) to account for GRE headers on the WAN interface. If you don't set an MSS, it can negatively impact tunnel performance.
Netskope recommends there is traffic from the endpoint at least every 30 minutes.
Workflow
The primary steps to configure GRE include:
Configure GRE in the Netskope UI.
Configure the GRE tunnel from the source device so that a primary and a failover exists. You can configure as many GRE tunnels as needed from the sites that you tunnel traffic from. Each tunnel supports up to 1 Gbps throughput.
Install the Netskope Client or provision the Netskope root certificate on devices.
Choose steering/identity options.
Configure GRE in the Netskope UI
You must add the IP addresses of your source devices (e.g., router, firewall, etc.) in the Netskope UI and copy the Netskope point of presence (POP) IP addresses to establish GRE tunnels on your devices.
Go to Settings > Security Cloud Platform > GRE.
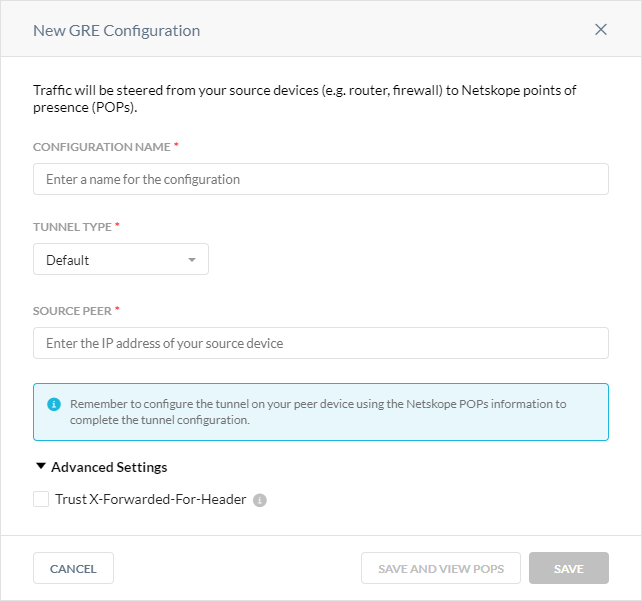
Click New GRE Configuration.
In the New GRE Configuration window:
Configuration Name: Enter a name for the GRE tunnel.
Tunnel Type: Select VeloCloud if you are using VMware SASE for your GRE tunnel. Otherwise, select Default.
Source Peer: Enter the source peer IP address (i.e., exit public IP) of the Cisco router that Netskope will receive packets from. Netskope identifies traffic belonging to your organization through your router or firewall IP addresses.
Advanced Settings: Click to view the following option.
Trust X-Forwarded-For Header: Select to trust IP addresses contained in the X-Forwarded-For (XFF) HTTP header at the tunnel level. If you trust XFF at the tenant level, you can't select this option.
Apply to all traffic: Use the XFF HTTP header to identify all user traffic going through the IPSec tunnel.
Apply to specific NAT/proxy IP(s): Use the XFF HTTP header to identify traffic from specific NAT and proxy IP addresses going through the IPSec tunnel. Click +Add Another to add multiple IP addresses.

Click Save and View POPs.
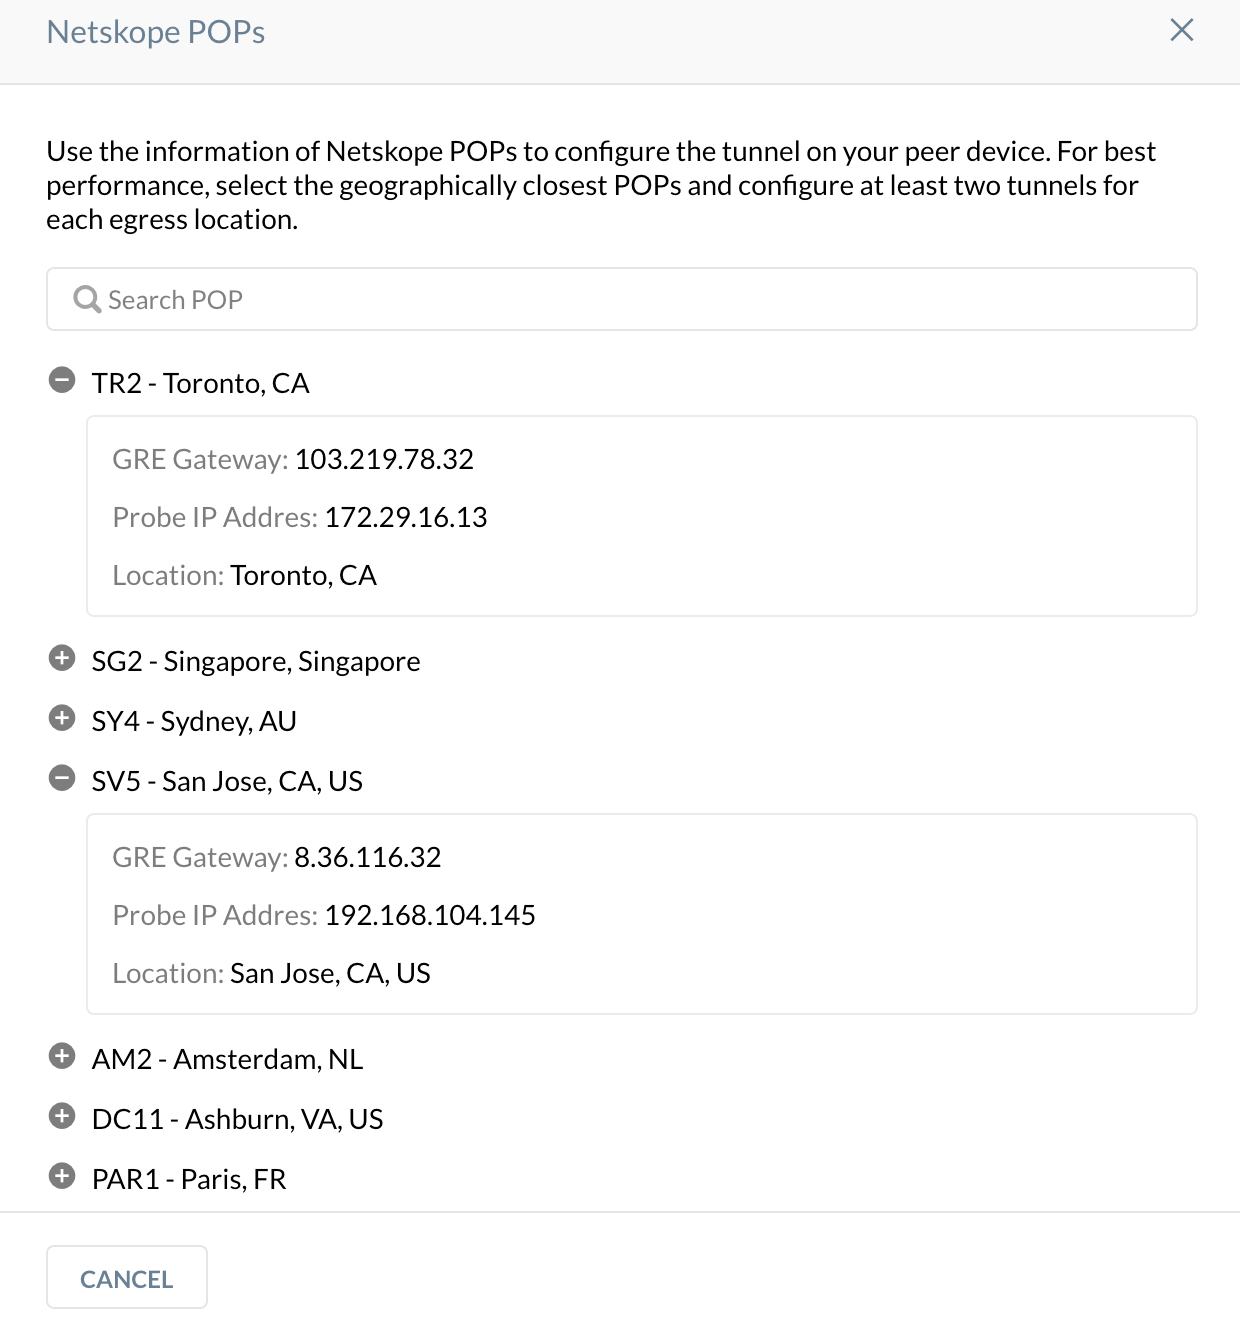
In the Netskope POPs window, copy the GRE Gateway IP address of the two closest Netskope POPs. You need this information to establish the GRE tunnels on your Cisco routers. For optimal performance, Netskope recommends using the geographically closest POPs and configuring two tunnels for redundancy.

After a tunnel has been established on your devices, the tunnel appears in the table on the GRE page. The table shows the following information the GRE configuration:
Name: The name of the GRE tunnel configuration.
Source Peer: The source peer of the GRE tunnel configuration.
Netskope POP: Lists the Netskope POPs.
User Traffic Status: Displays if the user traffic is Seen or Unseen.
User Traffic Last Updated: Displays the time since Netskope has seen user traffic. If no time is displayed, Netskope doesn't see any traffic.
Keepalive Last Updated: Displays the time since Netskope has seen the keepalive connection. If no time is displayed, Netskope doesn't see keepalive packets.
Keepalive Status: Displays if the keepalive connections are Seen or Unseen if you configured keepalives for the GRE tunnel configuration.
Throughput: The GRE tunnel throughput in kilobytes per second (Kpbs).
Click on a tunnel name to edit the GRE tunnel configuration. Also, click the  icon to the right of the tunnel listing to edit, enable, disable, or delete the tunnel.
You can also search for tunnel configuration using the filters for source peer, Netskope POP, User Traffic Status, and Keepalive Status.
Configure GRE Tunnels on Source Device
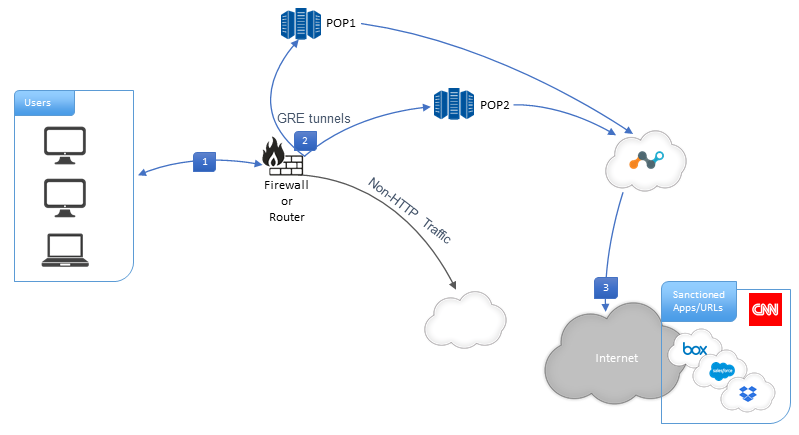
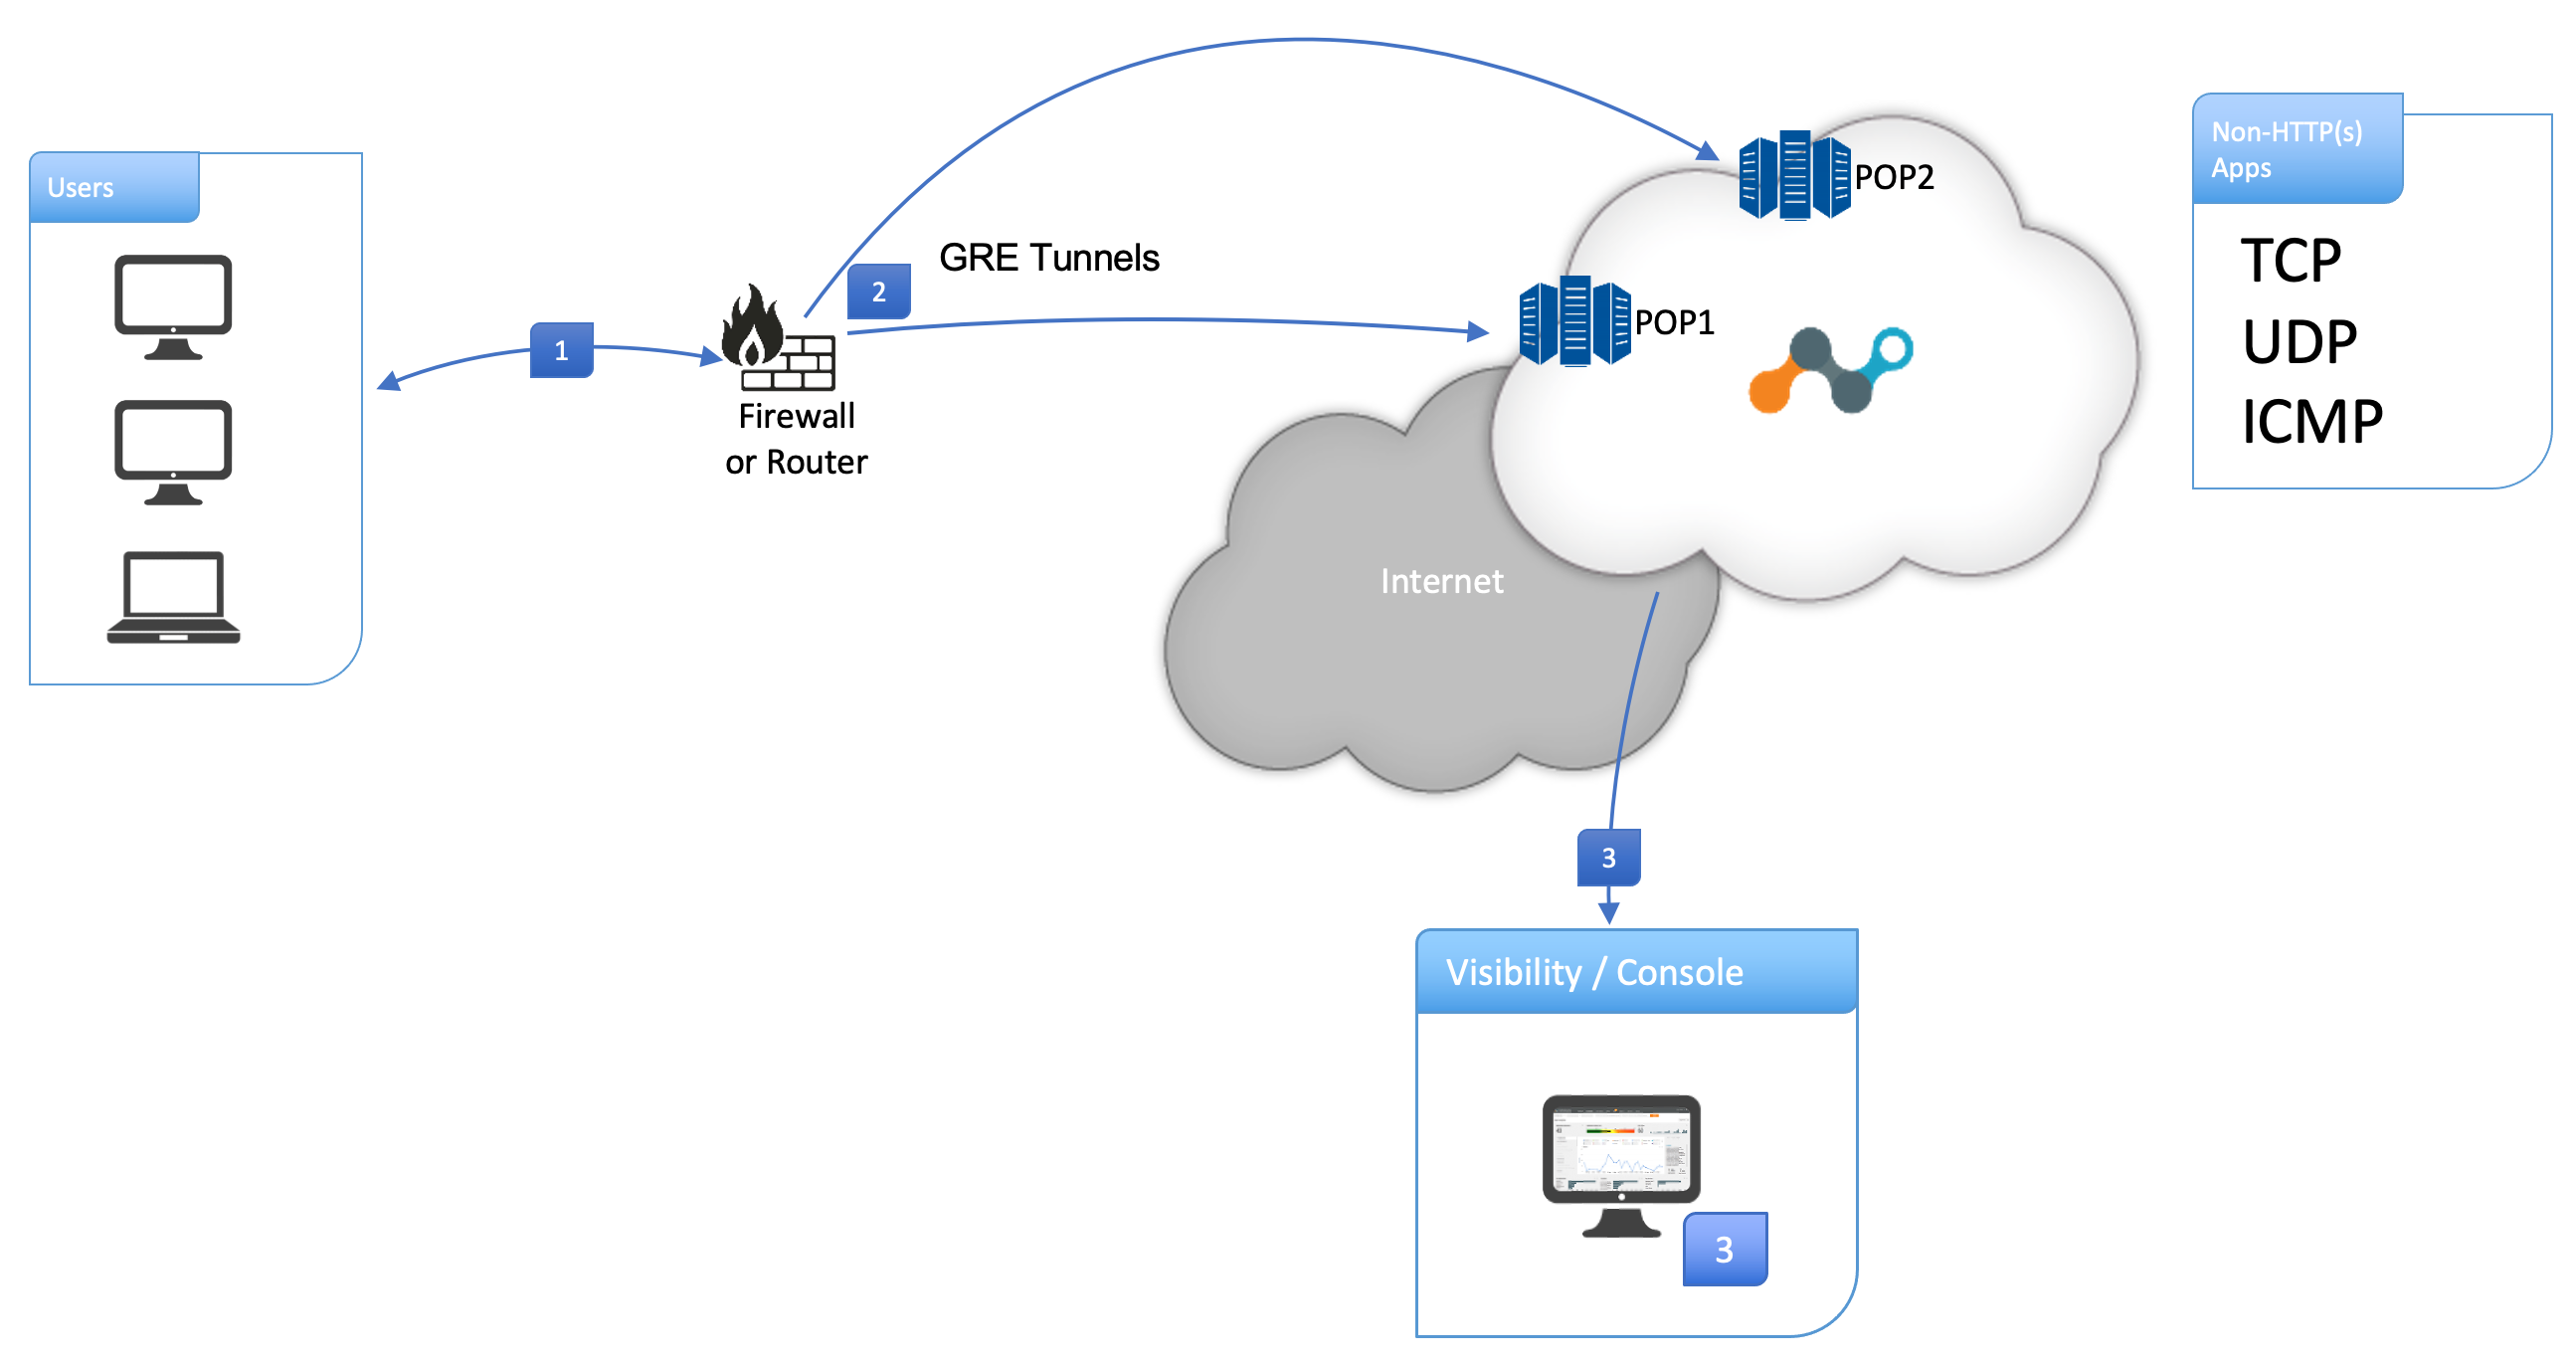
Netskope recommends configuring two GRE tunnels from your location to the Netskope POPs. This ensures high availability for tunneling traffic through GRE. Here is an example of how to configure your GRE tunnels:
Configure your router/firewall for GRE. Refer to Deploying GRE Tunnels and Monitoring GRE Tunnels below for specifics.
Configure the GRE tunnels to direct HTTP(s) (for Netskope Secure Web Gateway) and/or non-HTTP(s) (Netskope Cloud Firewall) traffic to the Netskope POPs.
Traffic is directed through the Netskope cloud.
The following diagram illustrates the GRE tunnel configuration with Netskope Secure Web Gateway:
 |
The following diagram illustrates the GRE tunnel configuration with Netskope Cloud Firewall:
 |
Deploying GRE Tunnels
Create two GRE tunnels for each egress location in your network. Having two GRE tunnels ensures that connectivity is maintained in the event of an outage on the primary tunnel. The backup GRE tunnel takes over until the primary GRE tunnel gets restored. The backup tunnel must be connected to a different Netskope POP than the primary one.
Calculate the maximum transmission unit (MTU) and maximum segment size (MSS) needed for your GRE tunnels based on the configuration of your WAN interface. If the MTU isn’t properly calculated, higher fragmentation can occur and impact performance.
Here is a sample MTU and MSS calculation for a WAN interface with 1500 bytes:
WAN Interface MTU = 1500
WAN Interface MSS = MTU (1500) - IP (20 bytes header) - TCP (20 bytes header) = 1460
GRE = 4 bytes header
GRE MTU = MTU (1500) - IP (20) - GRE (4) = 1476
GRE MSS = GRE MTU (1476) - IP (20) - TCP (20) = 1436
Important
Use policy-based routing to steer HTTP/HTTPS traffic on ports 80 and 443 through the GRE tunnels. If you have the Cloud Firewall license, you can also steer non-HTTP(s) traffic like TCP, UDP, and ICMP through the tunnels.
MTU Recommendation
If you're using Cloud Firewall, you must set the L3 MTU size to 1476 bytes on the client devices. The MTU value on the router or firewall can continue with the default MTU value of 1500 bytes.
Netskope recommends you allow the UDP applications on the client devices to support path MTU discovery (PMTUD) to avoid IP fragmentation if the MTU value isn't changed to 1476 bytes.
If the IP packet size exceeds 1476 bytes and has the Don't Fragment (DF) bit set, the Netskope GRE gateway drops the packet and sends the client an ICMP destination unreachable message with a code indicating "fragmentation needed and DF set". If the IP packet doesn't have the DF bit set, Netskope GRE gateway silently drops the packet.
TCP MSS Recommendation
Netskope GRE gateway adjusts MSS automatically for TCP traffic.
Monitoring GRE Tunnels
Monitor your GRE tunnels to ensure failover between the primary and backup GRE tunnels. Enable GRE keepalives as a basic detection mechanism.
For Cisco routers, you can use IPSLA or keepalive on the Cisco tunnel interface to monitor the tunnels.
The keepalives on Cisco devices use a GRE packet with the source and destination IP addresses reversed to be sent as the inner payload from the source peer. The GRE destination relays the inner packet to indicate the tunnel is up.
For Juniper routers, you can use RPM or keepalive to monitor the tunnels.
Keepalive on Juniper devices use an ICMP packet with the endpoint’s inner IPs to be sent over the GRE tunnel. These inner IPs are allocated by Netskope so that Netskope GRE gateway can be configured to respond that the tunnel is up.
For high-availability, the keepalives enable GRE endpoints to failover to a backup tunnel if a response isn't received. The Netskope GRE gateway sends back a keepalive response only if there are no health check issues with the tenant specific proxy.
If the Netskope GRE gateway doesn't observe a keepalive packet within a minute, the tunnel probe status will be flagged as down, and the GRE service will update the keepalive status as Not Seen in the Netskope UI.
Troubleshooting
Certificate Issues:
If you are seeing a certificate error in browser, check the Netskope certificate on the browser, make sure the Netskope root certificate is installed on the end-user devices.
Connection issues:
If end-to-end traffic is not working:
Check if the GRE tunnel status to see if it is up on the exit router.
Check the tunnel interface counters to see if they are going up or not, which would indicate the transit of traffic.
If a tunnel is down, check to make sure the GRE/ICMP keepalives sent by the exit router is receiving the keepalive response back.
If a tunnel is down, end-to-end traffic should be working through the router's default-gateway.
If the tunnel is up, check the route-map configured to re-direct the traffic.
Make sure the firewall is allowing GRE traffic.
Make sure the router exit IP (public IP) is added to the GRE page from Netskope console (tenant UI).
Route map should ideally be configured to redirect port 443/80 over the GRE Tunnel.
Contact Netskope Support.
Performance issues:
Check the MTR against the Netskope GRE IP address. It should show RTT between your environment to the Netskope Cloud. It will also show packet drops.
Capture packets at the endpoint egress interface using Wireshark. It will show complete TCP statistics.
GRE device status:
Login into the source peer device to determine the GRE tunnel status. If the tunnel is down, there is high chance that the device is not able to communicate with Netskope GRE service, or this GRE node/site is not yet provisioned. Go to the Netskope GRE page to confirm.