Enable PII Privacy Settings
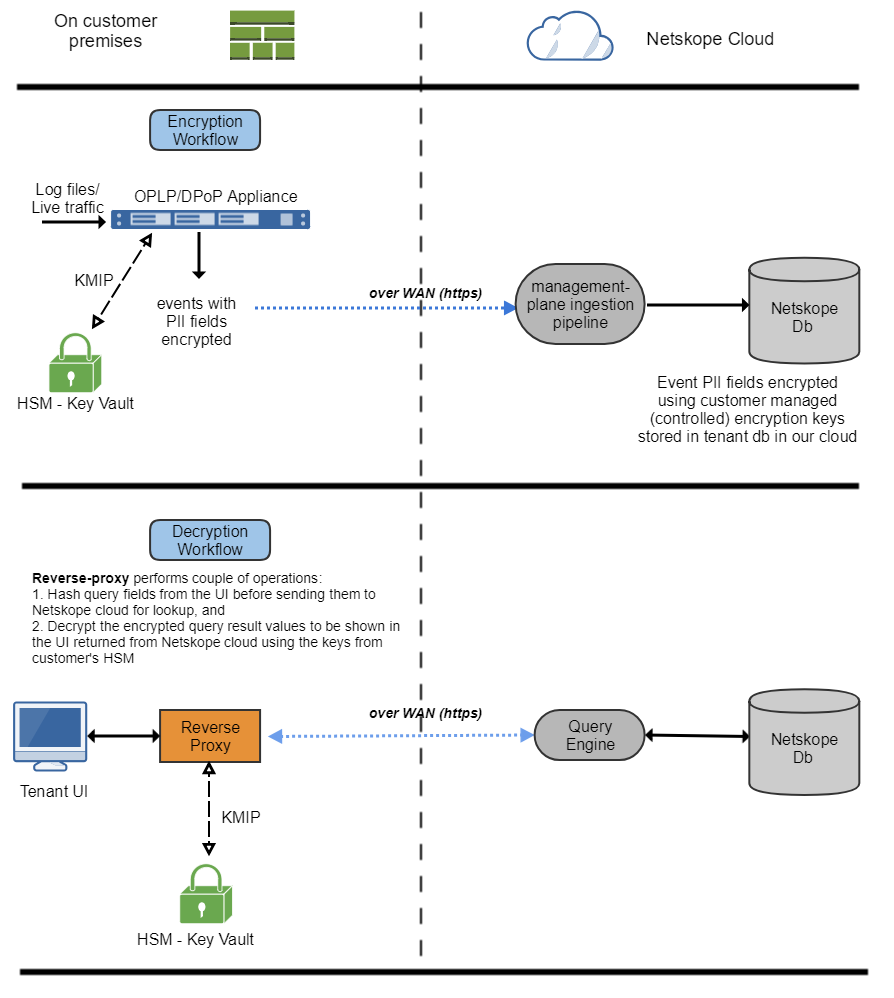
Customer Data Privacy Proxy (CDPP) is a powerful yet simple way for you to get enhanced technical privacy controls over your personally identifiable information (PII) data. CDPP can encrypt PII information in the uploaded logs such as user data, source IP addresses, and URL information.
The following diagram provides the CDPP workflow.

This feature is available for all tenants, but is disabled by default. Contact support@netskope.com to get this feature enabled.
Note
Netskope recommends that you enable CDPP on a dedicated virtual or physical appliance that runs only in CDPP mode.
Enable PII Settings in the Netskope UI
To enable the PII privacy settings:
In the tenant UI, go to Settings > Security Cloud Platform > CDPP for Appliance and click Edit.
Enable the toggle and select the fields you want to protect.
Click Save.
Enable PII Settings using the Command Line Interface
To enable the CDPP service, you must run set pii-privacy-proxy enable true and generate an encryption key by running request key generate pii-privacy-proxy. The encryption key is used to encrypt the data and uses a self-signed certificate for the reverse proxy that will be listening on port 443 (default).
The complete step-by-step commands are:
Enter
configureto enter configuration mode.Enter
set pii-privacy-proxy enable trueto enable CDPP.Enter
saveto enable the setting.Enter
exitto leave configuration mode.Enter
request key generate pii-privacy-proxyto generates the encryption key required to activate the configuration.Enter
exitto leave the configuration shell.
Additional commands can be used to tailor the configuration to your environment's requirements: like moving to a port other than 443, or using a real certificate/key for the reverse proxy.
Note
CDPP is enabled to create and store encryption and decryption keys for event fields locally. If you want to use your own key manager with CDPP to create and store encryption and decryption keys then enable KMIP. For more information see, KMIP CLI Commands for PII Privacy.
Multi-Node Deployments
Multiple OPLP and CDPP systems can be deployed to increase scale or to provide geographical distribution.
Because OPLP and CDPP are essentially stateless, there's no data to replicate or backup, so the same encryption keys must be installed on all of them. This is accomplished by exporting the keys from the first system and later importing them in subsequent systems. The pii-privacy-proxy import and pii-privacy-proxy export operational commands in the nsshell are used for this purpose.
KMIP CLI Commands for PII Privacy
The standard capability of the PII privacy proxy only allows symmetric encryption keys to be used to encrypt event fields created and stored locally. A Key Management Interoperability Protocol (KMIP) integration allows the OPLP to retrieve keys from a key manager over KMIP, which is a standardized communication protocol that defines message formats for cryptographic keys on a key management server. Using KMIP, PII privacy can be applied to events from an input log file. The events have fields such as src_ip (source IP address), user (username), and email (user email address) that can be encrypted for privacy reasons.
When KMIP server settings are enabled, OPLP uses symmetric keys that are retrieved from an external key manager to encrypt and decrypt data.
These new CLI commands have been added for configuring KMIP server parameters used by the KMIP client service running on the OPLP.
To configure KMIP parameters:
Enter
nsshellat the Linux shell prompt, to enter the Netskope configuration shell. Make sure you are logged in as thensadminuser.Enter
configure, to enter configuration mode, then enter any of these commands:set kmip-server ca-certCopy and paste your CA certificate in the buffer, press Enter , then type Ctrl-D to exit.
Specifies the CA cert to be used while verifying KMIP server certificate
set kmip-server client-certCopy and paste your CA certificate in the buffer, press Enter , then type Ctrl-D to exit.
Specifies the client certificate to be used during KMIP server interaction
set kmip-server client-keyCopy and paste your CA certificate in the buffer, press Enter , then type Ctrl-D to exit.
Specifies the client key to be used during KMIP server interaction
set kmip-server enable: Enables integration with an existing key manager over KMIPset kmip-server host<hostname or IP address>: Specifies the KMIP server hostname or IP addressset kmip-server port <port>: Specifies the KMIP server port (default port of 5696 is recommended).
Enter
saveto activate the configuration and create required objects.Enter
exitto leave configuration mode.Enter
exitto leave the configuration shell.
The KMIP commands listed above have to be set for the log collector process to connect to the external key manager over KMIP and retrieve keys for encrypting private fields in the processed events. Other optional commands include:
set kmip-key-cache enable: Enables in-memory caching for the keys retrieved from the HSM. Caching is enabled by default to limit the number of requests for fetching key objects from log files.set kmip-key-cache ttl <time in seconds>: Sets the time-to-live for the keys inside the cache. If kmip-key-caching is enabled no time is specified, the default time is set to 1 hour.
Note
Netskope now runs four instances of nsdetokenizer fronted by HA proxy, and the number of detokenizer processes are not configurable. The configuration previously applicable to nsdetokenizer will now be applied to HA proxy.
Note
With KMIP settings enabled, CDPP can still decrypt any data that was previously encrypted using local keys.