IPSec
Note
The following content shows the previous IPSec page. If you're using the new one in Beta, see IPSec.
Internet Protocol Security (IPSec) is a tunneling protocol for authenticating and encrypting packets inside a transport protocol. IPSec functions like a VPN but with encryption; it transports packets from one endpoint to another endpoint. IPSec has two modes, tunnel mode and transport mode. These instructions are for tunnel mode.
IPSec can steer HTTP(S) and non-HTTP(S) traffic to the Netskope cloud. Configure the source peer IPSec device to send traffic over the IPSec VPN tunnel. The Netskope IPSec gateway validates the source identity of the tunnel configured in the Netskope admin console. If the tunnel identity is not known, the tunnel is not established.
Best Practices
To use IPSec:
Configure your source peer devices (like routers or firewalls) to establish the IPSec tunnel. Refer to your router (or firewall) documentation for specific configuration instructions.
For Cisco routers, you can use IPSLA or use keepalive on the Cisco tunnel interface to monitor the tunnels.
For Juniper routers, you can use RPM (real-time performance monitoring) to monitor the VPNs.
Configure your firewalls, if any, to allow the IPSec tunnel. If your firewall has an ACL blocking inbound connections, configure a rule to allow IPSec traffic. Refer to your firewall documentation for specific configuration instructions.
Download the Netskope root certificate to provision on your devices. Get the Netskope root certificate from: Settings > Manage > Certificates. If you install the Netskope Client on devices, this is not necessary.
Get the closest Netskope point of presence (POP), or data center, IP addresses to steer traffic to the Netskope cloud. Refer to Settings > Security Cloud Platform > Traffic Steering > IPSec in the Netskope UI to get the POP IP addresses.
Get the IP address or fully-qualified domain name and pre-shared key for your source identity devices. You will need to enter this in the Netskope UI, along with the type of encryption cipher and the maximum bandwidth to use.
Ensure you have a Netskope Secure Web Gateway or Netskope Cloud Firewall license, which is required to use IPSec.
Send HTTP/HTTPS traffic on ports 80 and 443 through the IPSec tunnel. Netskope also supports custom ports. If you have the Cloud Firewall license, you can also send non-HTTP(S) traffic through the tunnel.
Note
Netskope negotiates HTTP/2 for all domains if the origin server supports it; otherwise, Netskope fallbacks to HTTP 1.1. All other traffic will continue to leverage HTTP 1.1. In addition, the Netskope Client and GRE / IPSEC and iOS access methods are fully supported. The protocol change is completely transparent to users, no configuration is required by admins. Contact Support to enable this feature in your account.
On the tunnel source device, ensure that the IPSec and IKE SA rekey time intervals are at least less than 10 minutes than the default values of 120 (IPSec SA) and 1440 (IKE SA). Netskope recommends there is traffic from the endpoint at least every 30 minutes.
Send Voice over Internet Protocol (VoIP) data ports directly to the internet.
You must enable network address translation traversal (NAT-T). Netskope does not support implementing NAT for endpoints inside an IPSec tunnel.
Netskope strongly recommends enabling ICMP keepalive probing and IKE Dead Peer Detection (DPD) for each tunnel on the device, including the failover to the backup tunnel. Enabling these features ensures a reliable status output in the Netsope UI especially if tunnel failure occurs.
Netskope doesn't recommend configuring make-before-break (MBB) tunnel reauthentication semantics at the peer gateways because it can cause interoperability issues.
Netskope only supports IKEv2. The maximum number of Child SAs per IKE connection at one time is 10. Following is the complete list of supported ciphers:
Phase 1 Parameters
Encryption algorithms: AES128-CBC, AES192-CBC, AES256-CBC
Integrity algorithms: SHA1, SHA256, SHA384, SHA512
DH Group: 14, 15, 16, 18
SA lifetime: 24 hours
Phase 2 Parameters
Encryption algorithms: AES128-CBC, AES256-CBC, AES128-GCM, AES192-GCM, AES256-GCM, Null
Integrity algorithms: SHA1, SHA256, SHA384, SHA512
DH Group: 14, 15, 16, 18
PFS: Supported
SA lifetime: 2 hours
Authentication
PSK
Workflow
The primary steps to configure IPSec include:
Configure IPSec tunnels in the Netskope UI.
Configure IPSec tunnels on your source identity devices.
After configuring the IPSec tunnels, choose steering/identity options, such as install the Netskope Client or provision the Netskope root certificate on devices.
To watch videos about IPSec setup, steering, and use, go to: Netskope Microlearning Videos.
Configure IPSec in the Netskope UI
Follow these steps to set up your IPSec tunnels, which requires adding the IP address or fully-qualified domain name (FQDN) of your routers/firewalls in the Netskope admin console. You will also need to know the pre-shared key used for authentication in you router/firewall to complete these steps.
Go to Settings > Security Cloud Platform > Traffic Steering > IPSec.
You can add IPSec tunnels manually or by uploading a CSV file. To add new IPSec tunnels manually, review the following field descriptions and go to Step 3:
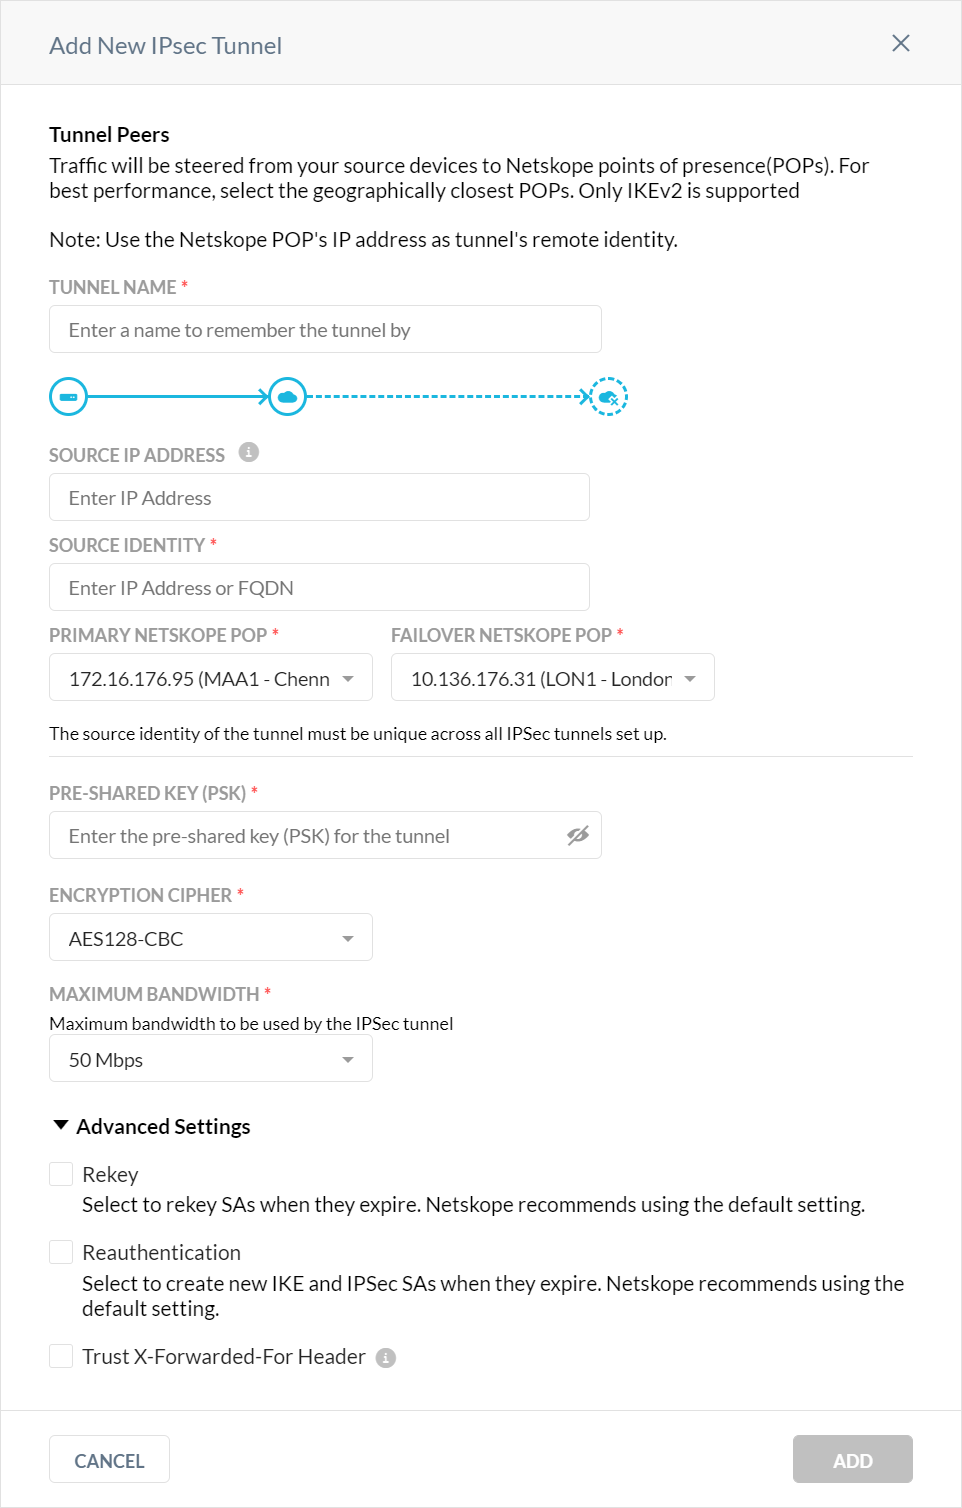
Tunnel name: Create a tunnel name that makes sense to your topology.
Source IP address: (Optional) As an added security measure, you can restrict this tunnel to only this source IP. Leave this field blank if the source IP address is not static and changes frequently.
Source identity: Enter an IP address, a fully-qualified domain name (FQDN), or an ID in email address format. For example, 1.1.1.1., sourcelocation.company.com, or sourcelocation@company.com., respectively. The source identity is used as the IKE identifier on the router that originates the tunnel.
Primary and Failover Netskope POP: Select the points of presence (POPs) closest to your location from the drop-down lists. If you're importing this information using a CSV file, enter the names of the POPs (e.g., NYC1, LON1, HKG1, etc.).
Encryption cipher type: Select one from the dropdown list.
Pre-shared key: Enter a pre-shared key that both sides of the tunnel will use to authenticate one another. Must be unique for each tunnel.
Max bandwidth limit (in Mbps): Enter the maximum bandwidth for the IPSec tunnel. The tunnel size can be up to 1 Gbps.
Note
The 500 Mbps option requires an additional license. Contact your Sales Representative or Support to enable it.
The 1 Gbps option is in Beta currently. Contact your Sales Representative or Support to enable it.
Tunnel state: Like Enabled=true.
Advanced Settings: Click to view the following options.
Rekey: Select to rekey SAs when they expire. Netskope recommends using the default setting.
Reauthentication: Select to create new IKE and IPSec SAs when they expire. Netskope recommends using the default setting.
Trust X-Forwarded-For Header: Select to trust IP addresses contained in the X-Forwarded-For (XFF) HTTP header at the tunnel level. If you trust XFF at the tenant level, you can't select this option.
Apply to all traffic: Use the XFF HTTP header to identify all user traffic going through the IPSec tunnel.
Apply to specific NAT/proxy IP(s): Use the XFF HTTP header to identify traffic from specific NAT and proxy IP addresses going through the IPSec tunnel. Click +Add Another to add multiple IP addresses.

To upload a CSV file, which can be up to 10 MB large, download the sample CSV. Arrange the column structure in this order: Tunnel Name, Source IP Address, Source Identity, Primary POP, Failover POP, Encryption, Cipher, PSK, Maximum Bandwidth, Enabled. For example:
tunnel name,source identity,source ip address,primary pop,failover pop,encryption cipher,psk,maximum bandwidth,enabled
TunnelHQ,admin@abc.net,1.1.1.1,NYC1,ATL1,AES128-CBC,netSk0pe,50,true
To upload the CSV file, click Import Tunnels from CSV, click Select CSV File, and select the file. Review the list, and then click Import, which takes you back to the IPSec page.
To create a new IPSec tunnel individually in the UI, click Add New Tunnel, and then add or select these parameters:
Enter a unique tunnel name.
(Optional) Enter the source IP address.
Enter the source identity, which can be an IP address, FQDN, or email address.
Select the Primary and Failover Netskope POPs from the dropdown lists. Select POPs nearest to your location.
Enter your pre-shared key.
Select an encryption cipher type from the dropdown list.
Select the maximum bandwidth for the tunnel from the dropdown list.
Netskope recommends using the default advanced settings.
When finished, click Save, which takes you back to the IPSec page.
After a tunnel has been established, it appears in the table on the IPSec page. The table shows the status of the tunnel, the name, source peer, Netskope POP, and the throughput in kilobytes per second (Kpbs). You can edit, disable, or delete a tunnel.
The status types are:
Tunnel Up: The IPSec service is observing keepalive packets from the IPSec device.
Tunnel Down: The IPSec service is not observing any keepalive packets for one minute from the IPSec device. Tunnel down does not mean Netskope will stop processing a tunnel packet; Netskope continues to process the packet.
Tunnel Unknown: This is a transient state if the IPSec service is not reported any status to the Netskope UI.
Tunnel status is displayed as up or down based on the RFC DPD standards. You can enable your tunnel as a permanent tunnel. However, to ensure the Netskope UI displays reliable tunnel states, especially if a tunnel failure occurs, Netskope recommends enabling ICMP keepalive probing or DPD for each tunnel on the device, including the failover to the backup tunnel.
Click on a tunnel to open the Tunnel Details side panel, and to make changes to the tunnel, click Edit. Also, click the ... icon to the right of the tunnel listing to view details, edit, enable, disable, or delete the tunnel.
Configure IPSec Tunnels
Netskope recommends configuring IPSec tunnels from your router/firewall to two different Netskope POPs. This ensures resiliency for tunneling traffic through IPSec in the event one of the two identity source peers is temporarily not available.
To configure your IPSec tunnels:
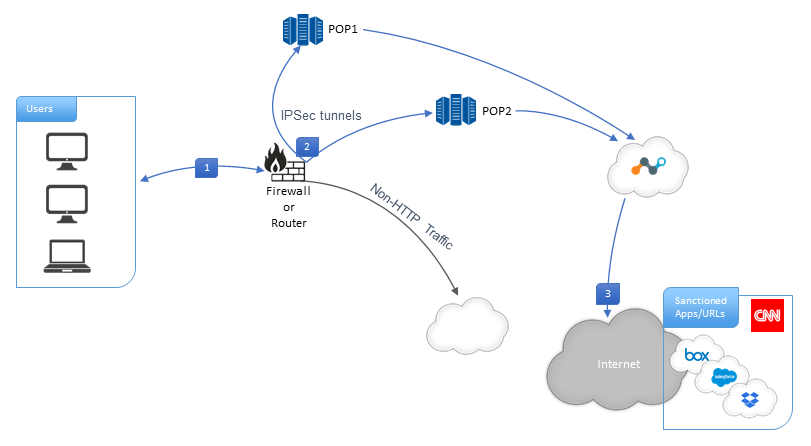
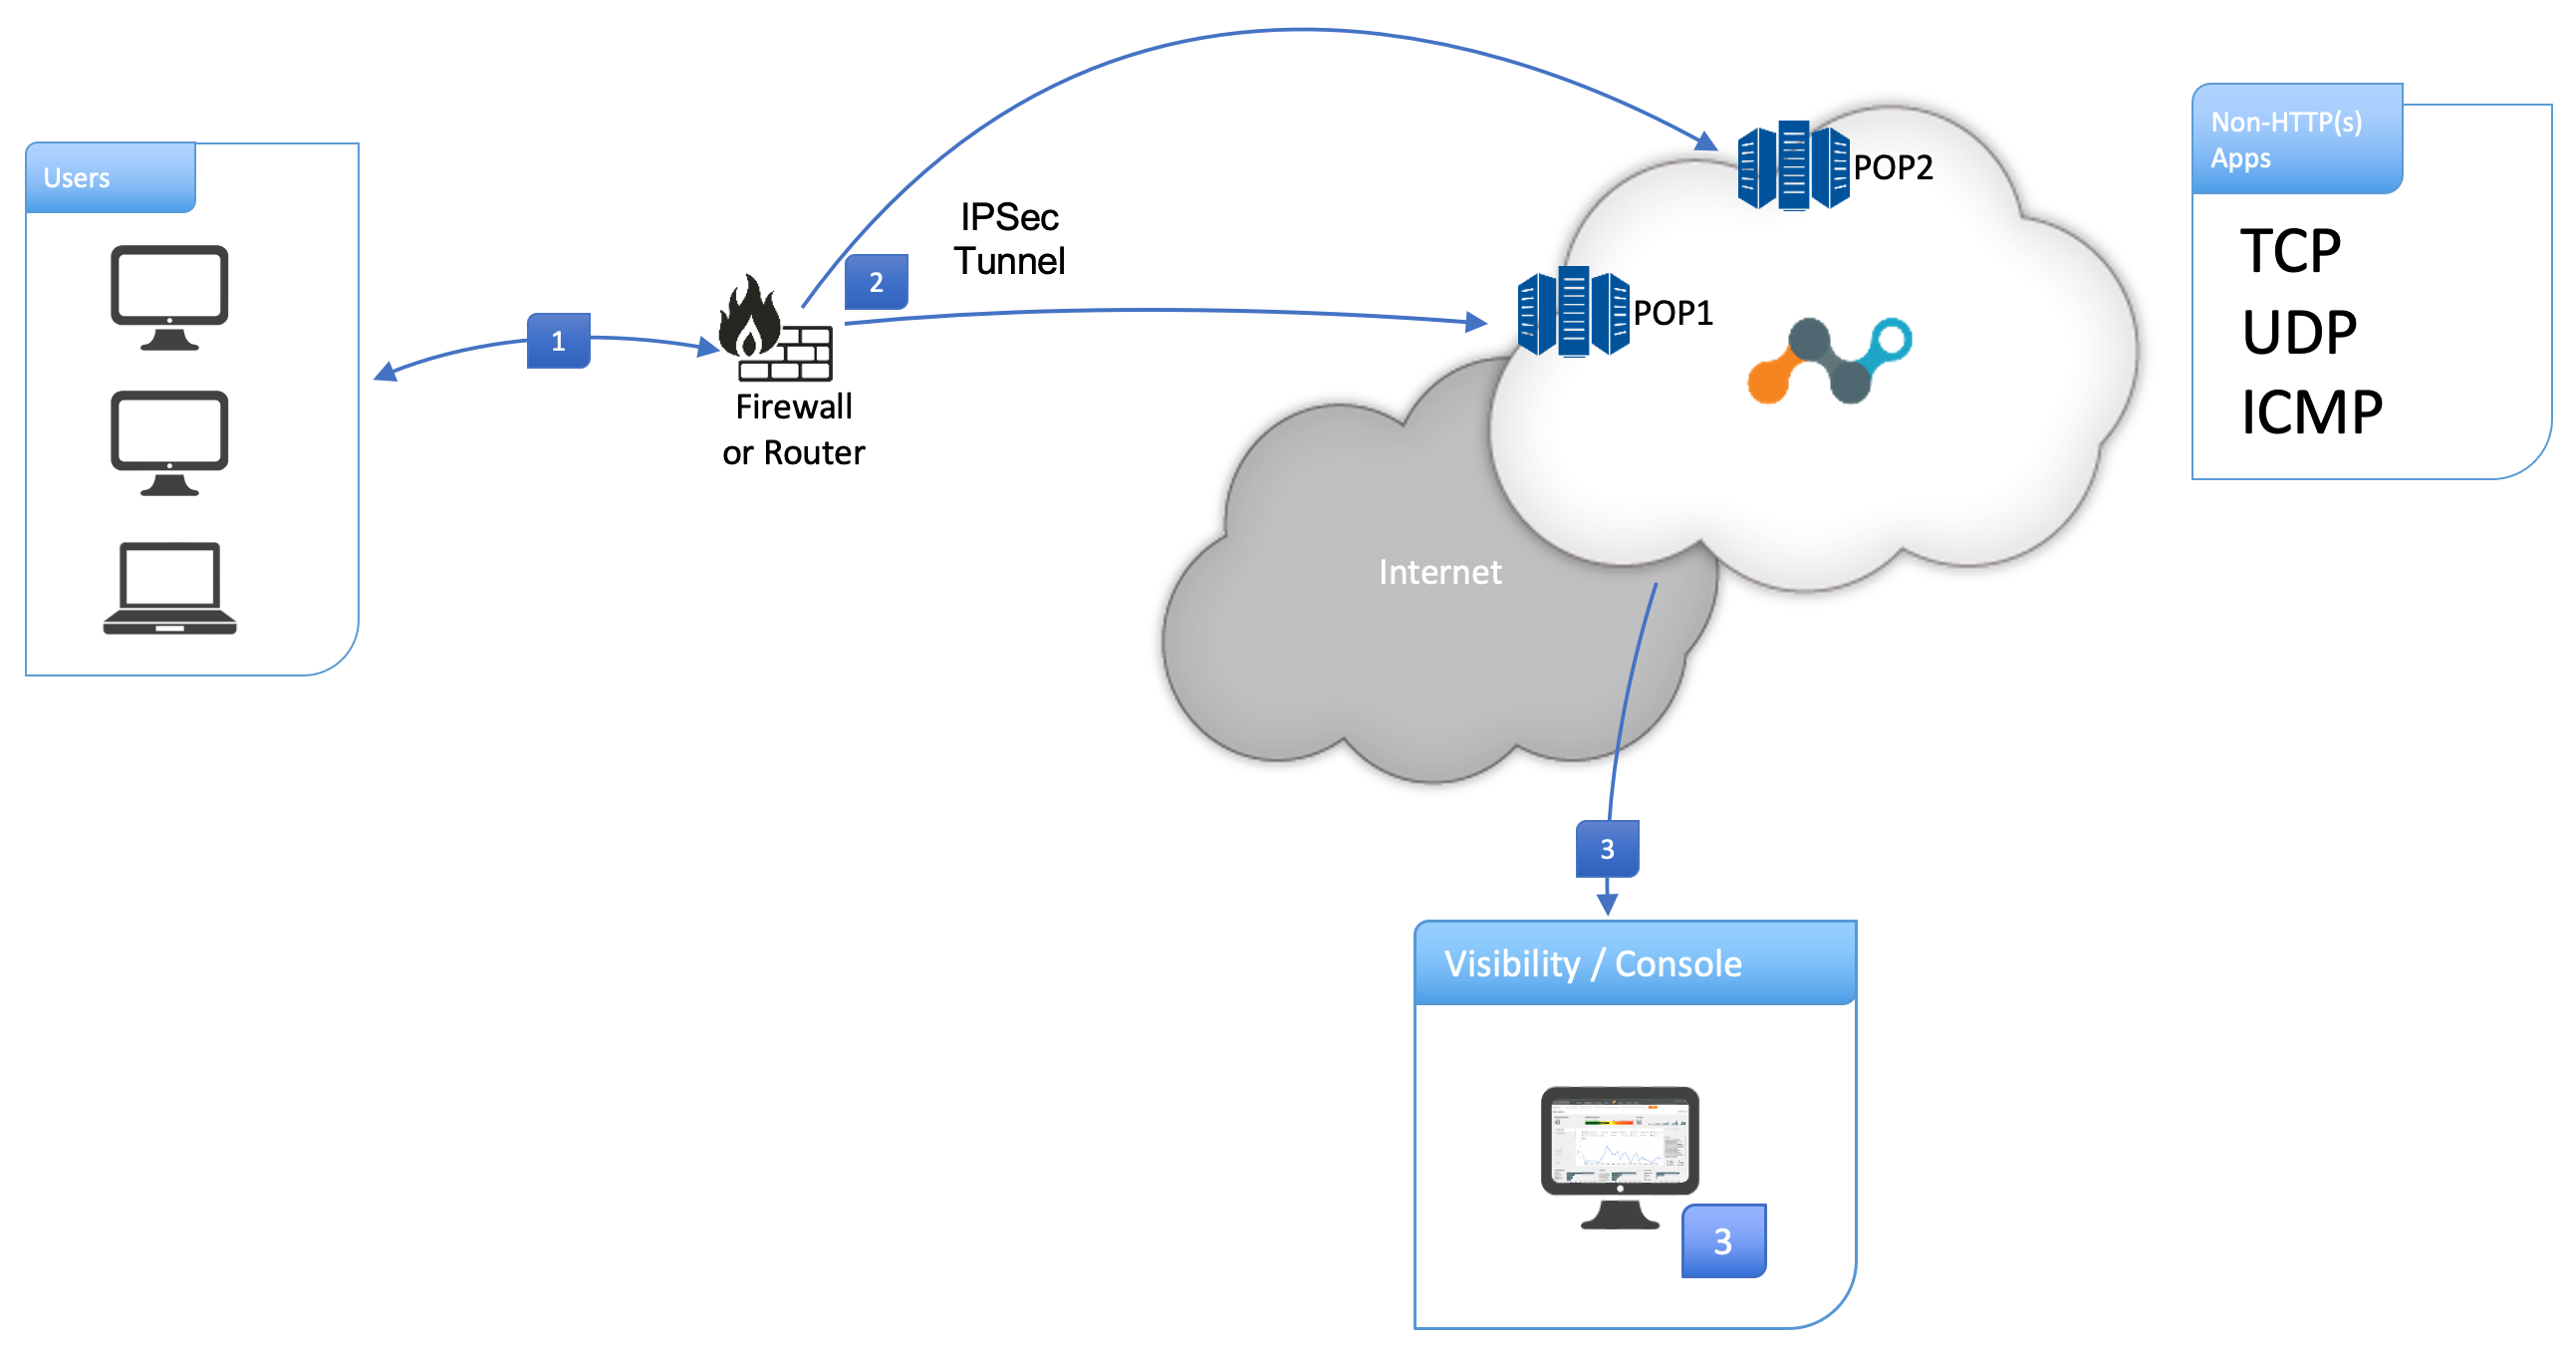
Configure your router/firewall for IPSec. Use policy-based routing to steer HTTP/HTTPS traffic on ports 80 and 443 through the IPSec tunnels. If you have the Cloud Firewall license, you can also steer non-HTTP(s) traffic like TCP, UDP, and ICMP through the tunnels.
Configure the IPSec tunnel to direct traffic to the the Netskope POP. The POP addresses are available in the Netskope admin console at Settings > Security Cloud Platform > Traffic Steering > IPSec when you click Add New Tunnel. The POPs are shown in the dropdown lists for the Primary and Failover Netskope POPs.
Traffic is directed through the Netskope cloud. You can manage the connections in the Netskope UI.
The following diagram illustrates the IPSec tunnel configuration with Netskope Secure Web Gateway:
 |
The following diagram illustrates the IPSec tunnel configuration with Netskope Cloud Firewall:
 |