Deploy Client on Android Using VMware Workspace ONE
The Netskope app can be configured for Android in these modes:
VMware Workspace ONE SDK Public Application
VMware Workspace ONE Internal Application
VMware Workspace ONE with Android for Work Managed Configurations
VMware WorkSpace One for Android Enterprises using Managed Google Play
Public Application mode leverages Google Play to help end users install the app on the device and therefore also supports the auto-update feature provided by Android OS. For this reason, we prefer the Public Application instead of the Internal Application.
VMware Workspace ONE uses apps that are already published on Google Play, like the Netskope Client, which can be used with the VMware Workspace ONE Console. For this procedure you'll need the Organization ID value from the Netskope UI (Settings > Security Cloud Platform > Netskope Client > MDM Distribution > Create VPN Configuration).
To configure the Netskope app using the VMware Workspace ONE SDK:
In the VMware Workspace ONE Console, go to Resources > Apps > Native.
Select the Public tab and click + Add Application.
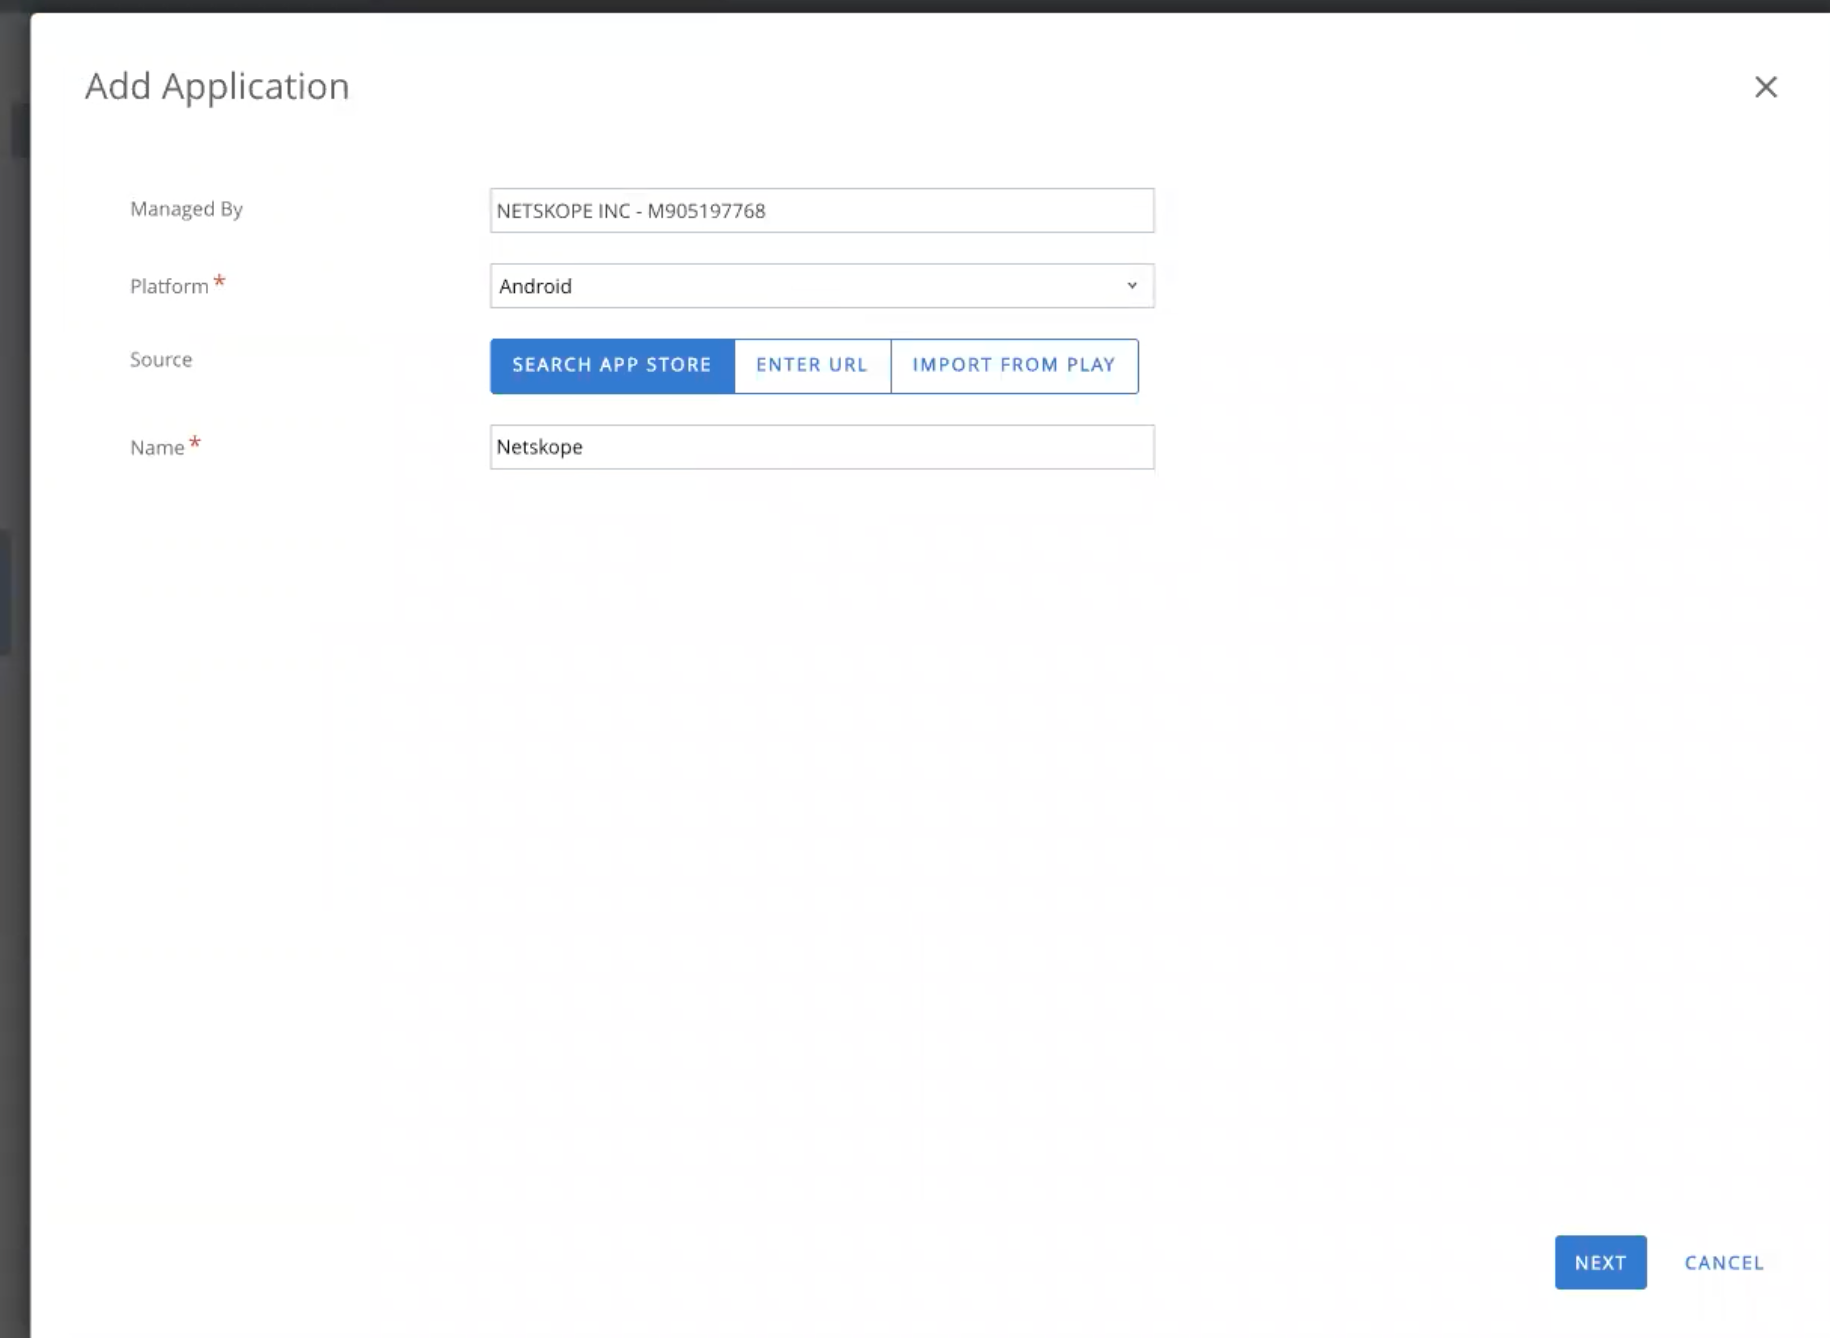
In Add Application, select Android for Platform.
Click Enter URL, and then enter this Netskope app Google Play Store URL (
https://play.google.com/store/apps/details?id=com.netskope.netskopeclient). Click Next.On the Add Application with the Netskope Client page, provide the application name and click Save & Assign.
Select the Netskope Client app, and then open the Assignment page. Assign the application to Smart Groups and complete the options. Enter text to display a list of available Smart Groups to assign the application.
On the Assignment page, click Add Assignment and assign the application to Smart Groups. Under Application Configuration and configure these parameters:
Click Add and enter
User Emailand{EmailAddress}for the Configuration Key and Configuration Value, respectively.Click Add and enter token and your
<Orgkey>value (Organization ID from the Netskope UI) for the Configuration Key and Configuration Value, respectively.Click Add and enter
hostand theaddon-<tenant hostname>.goskope.comvalue for the Configuration Key and Configuration Value, respectively.Note
For deployments with release 46 and above, use the above domain name. For deployments with release 45 and lower, use
addon.goskope.com. For international deployments, use ~.eu.goskope.comor ~.de.goskope.com.
This configuration is passed by VMware Workspace ONE to the Netskope app after installation.
Click Save & Publish to push the Public Application to devices.
The Published App will be available in VMware Workspace ONE after some time. Go to the Managed App section to install a device on the App listing.
The Netskope Android app package can be uploaded and distributed using the Admin console. You can get the Netskope app package (NSClient.apk) by going to Support.netskope.com, logging in, then going to Netskope Client > Netskope Client for Android and then click NSClient.apk to save this file locally. For this procedure you'll need the Organization ID value from the Netskope UI (Settings > Security Cloud Platform > Netskope Client > MDM Distribution > Create VPN Configuration).
To deploy the Netskope app as an Internal App:
In the VMware Workspace ONE console, go to Resources > Apps > Native > Internal .
Click Add > Application File.
Click Upload and select Local File. Select Choose File to locate the
NSClient.apkfile you downloaded previously, and then click Save.Click Continue and configure options on the Info tab.
All fields are filled automatically except Minimum OS. The Minimum OS should be
Android 4.1.0.Assign the application to Smart Groups on the Assignment tab. For Assigned Smart Groups, enter text to display a list of available Smart Groups to assign the application.
Configure the deployment details of the application on the Deployment tab to control availability and configuration. Select Send Application Configuration to get to the Configure Application section:
Click Add and enter
User Email Addressand{EmailAddress}for the Configuration Key and Configuration Value, respectively.Click Add and enter
tokenand the<Orgkey>(Organization ID in the Netskope UI) value for the Configuration Key and Configuration Value, respectively.Click Add and enter
hostand theaddon-<tenant hostname>.goskope.comvalue for the Configuration Key and Configuration Value, respectively.Note
For deployments with release 46 and above, use the above domain name. For deployment with release 45 and lower, use
addon.goskope.com. For international deployments, use ~.eu.goskope.comor ~.de.goskope.com.To use the Device Classification function in Netskope, click Add and enter
ns_mdm_checkfor the key and the value from the Netskope UI (Settings > Manage > Device Classification > Managed Config) for the Configuration Key and Configuration Value, respectively.
This configuration is passed by VMware Workspace ONE to the Netskope app after installation.
Select Save & Publish to push the Internal Application to devices.
The Published App will be available on the VMware Workspace ONE app. Go to the Managed App section to install a device on the App listing.
The Netskope app supports the Android for Work Managed Configurations with VMware Workspace ONE. This section describes how to configure VMware Workspace ONE for Android for Work so the Netskope app can accept Android Managed Configurations. For this procedure you'll need the Organization ID value from the Netskope UI (Settings > Security Cloud Platform > Netskope Client > MDM Distribution > Create VPN Configuration).
Note
Organization ID is case-sensitive.
To learn more, view registering Android with Managed Google Domain.
To use Android Enterprise devices in VMware Workspace One, set up a Managed Google Play account.
Prerequisite
Login to Workspace ONE UEM console and register your Android enterprise through Managed Google Play Accounts. To learn more, view Registering your Android device.
Environment
Workspace ONE UE Version: Workspace ONE UEM version 9.4 and later.
Netskope Client Playstore Version: 96.0.0.1009
Android Enterprise Modes
Netskope supports the following Android device modes:
Android Managed
Android BYOD
Android COPE
To learn more about different Android device modes, view Device Modes.
Deploying Android Applications
Perform the following steps to deploy your Android applications:
Go to Resources > Apps > Native > Public > +Add Application.

Provide the mandatory fields and click Next.
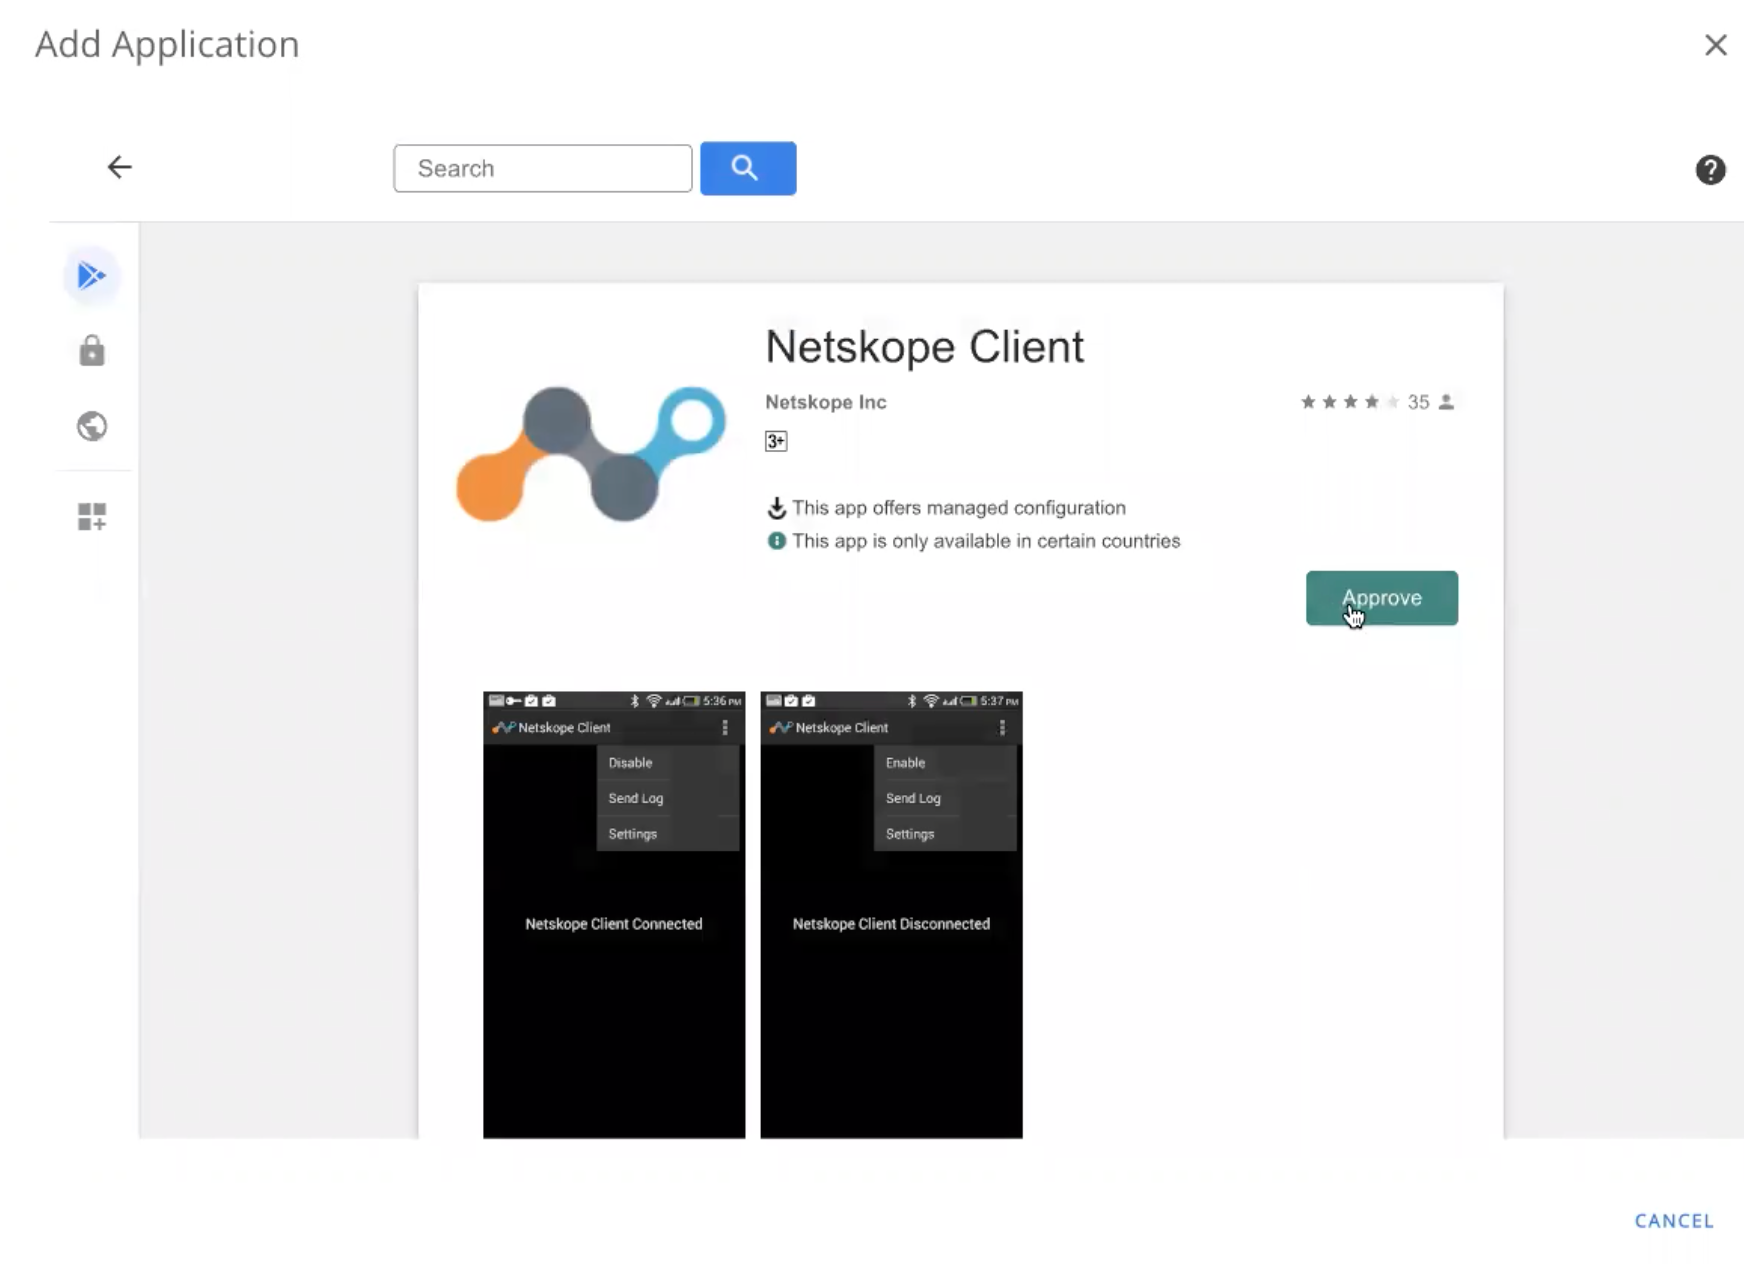
Select Netskope Client.
Click Approve.

In the Edit Application - Netskope Client, check the existing details.
Click Save and Assign.
In the Netskope Client - Assignment page, assign your Netskope Client to a device mode.
Click Create.
Click Save and Publish the Netskope Client to the web.
Click Deployment to configure the application and control availability.
Enter these parameters:
Push Mode: Set the application to install automatically (auto) or manually (on demand) when needed.
Send Application Configuration: Enable this checkbox.
Application Configuration: Enter the key/value information for these fields:
Enter User Email Address and {EmailAddress} for the Configuration Key and Configuration Value, respectively.
Enter token and your < Orgkey > value (Organization ID in the Netkkope UI) for the Configuration Key and Configuration Value respectively.
Enter host and the addon-< tenant hostname >.goskope.com value for the Configuration Key and Configuration Value respectively.
You can classify Android devices based on these criteria:
Minimum OS version
Passcode required
Device not compromised
Primary storage encrypted
Managed configuration
Go to Settings > Manage > Device Classification and select Android on the New Device Classification dropdown list, and then follow these steps to classify your Android device. Select options and enter the requested parameters.
Rule Name: Enter a name for this classification rule.
Classification Criteria: Select an Any or All criteria match.
Minimum OS Version: Select an OS version from the dropdown list or create a custom OS version.
Passcode Required: No parameters required.
Device Not Compromised: No parameters required.
Primary Storage Encrypted: No parameters required.
Managed Configuration: If you already added a managed configuration for this device on the MDM Distribution page, the key-value pair is shown here. This key-value pair is sent from the MDM to the device so the Netskope app can validate the key-value pair and mark it as Managed or Unmanaged. To regenerate the key-value pair, click Regenerate.
Note
Managed Configuration does not work when an app is installed on an Android device using the onboarding email or with the AirWatch SDK.
When finished, click Save.
After creating a device classification rule, you can use it in a Real-time Protection policy.
To use this Device Classification in a Real-time Protection policy, click Policies > Real-time Protection in the Netskope UI. Select an existing policy or click New Policy and choose a policy type.
Proceed through the Users, Cloud Apps + Web, DLP/Threat Protection, and Select Activities sections.
For Additional Attributes, click Access Method and select either Client, Mobile Profile, or Reverse Proxy, and then click Save. Click Device Classification, and then select Managed or Unmanaged, based on the devices you just classified.
Managed means the device is managed; the device information sent by the Client matches at least one of the device classification checks configured for that Client's OS.
Unmanaged means the device is unmanaged; the device information sent by the Client matches none of the device classification checks configured for that Client's OS.
When finished, click Save and then Next.
Combine device classification with other policy elements, like using the Block Action for specified applications for activities like uploading files from managed or unmanaged devices. Finish creating or updating this policy to establish this device classification. Click Apply Changes for this policy.
After the policy has been created, perform the process for which the policy was created. Next go to Skope IT > Application Events and click the magnifying icon for an event to open the Application Event Details panel. In the User section you'll see a Device Classification field, which shows one of these device classifications.